If a project does not yet exist, any registered user, whether a Team Admin or a regular Team User, can create a new project as its creator, excluding the Super User. With the SimpleELN MultiTeam Edition, each project can be shared not only among various members within the same team, but also across members of different teams. Note: Team administrators not only have read-only/comment permissions for projects created by their team members, but also for projects created by non-team members and shared with their team members.
The sharing permissions for different users are detailed as follows:
The Creator
full privileges
read-write/comment access
change the annotation data created by oneself
cannot change the annotation data created by other users
The Team Users
no sharing access if not shared by the project creator
read-only/comment sharing access if read-only shared by the project creator
read-write/comment sharing access if read-write shared by the project creator
read-write/comment access
change the annotation data created by oneself
cannot change the annotation data created by other users
The Team Admin
read-only/comment sharing access for projects created by their team members
read-only/comment sharing access for projects created by non-team members and shared with the team members
read-write/comment sharing access if read-write shared by the project creator
read-write/comment access
change the annotation data created by oneself
cannot change the annotation data created by other users
To set project sharing permissions, the creator of a project has the following options:
1.5.3.2. Notebook Sharing Among Members of the Same Team
To ensure effective collaboration among various members within the same team on a project, kindly refer to the reference Notebook Sharing Within Team Members for guidance, as outlined below:
The creator creates a new non-shared project. Although the project is not shared with other team members, the team administrator of the creator’s team has read-only/comment permissions on the non-shared project. Please refer to Share a non-shared project to share the project with members from the same team. Please follow the instructions below to share the project with members from different teams.
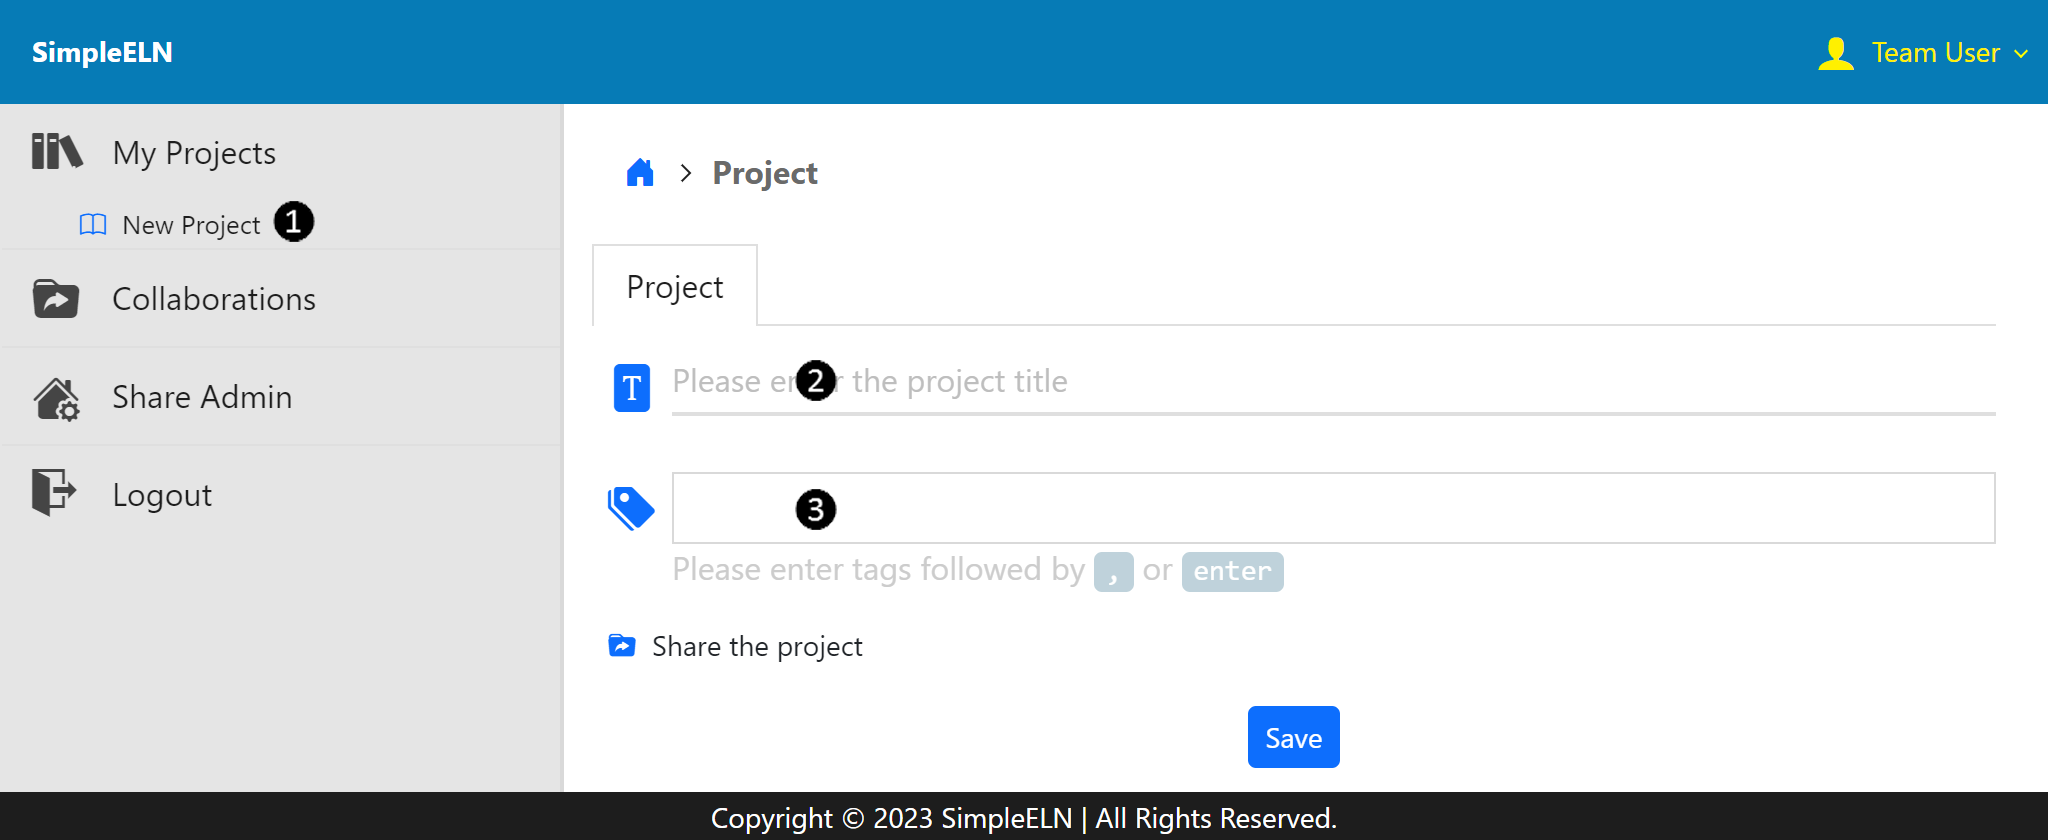
From the left navigation panel, click on New Project to redirect to the Create New Project page.
Option 1: From the left navigation panel, select My ProjectsNew Project in sequence.
Option 2: From the left navigation panel, select CollaborationsUser NameNew Project in sequence.
Enter a meaningful sentence as the Notebook Title (Project Title).
Enter meaningful keywords as the Project Tags.
Complete and submit the form.
Please refer to the reference Create a Non-Shared Project for detailed step-by-step instructions on how to create a new non-shared project.
Note: The sharing accesses are specified at the project level, please refer to the reference Notebook Creation for entering additional data for a new project.
If a non-shared project exists, the creator of the project can grant read-only/comment or read-write/comment permissions to specific team members, whether they are from the same team or different teams. Please adhere to the instructions below to configure the sharing accesses for the project:
Option 1: Share a Non-Shared Project via My Projects Entry
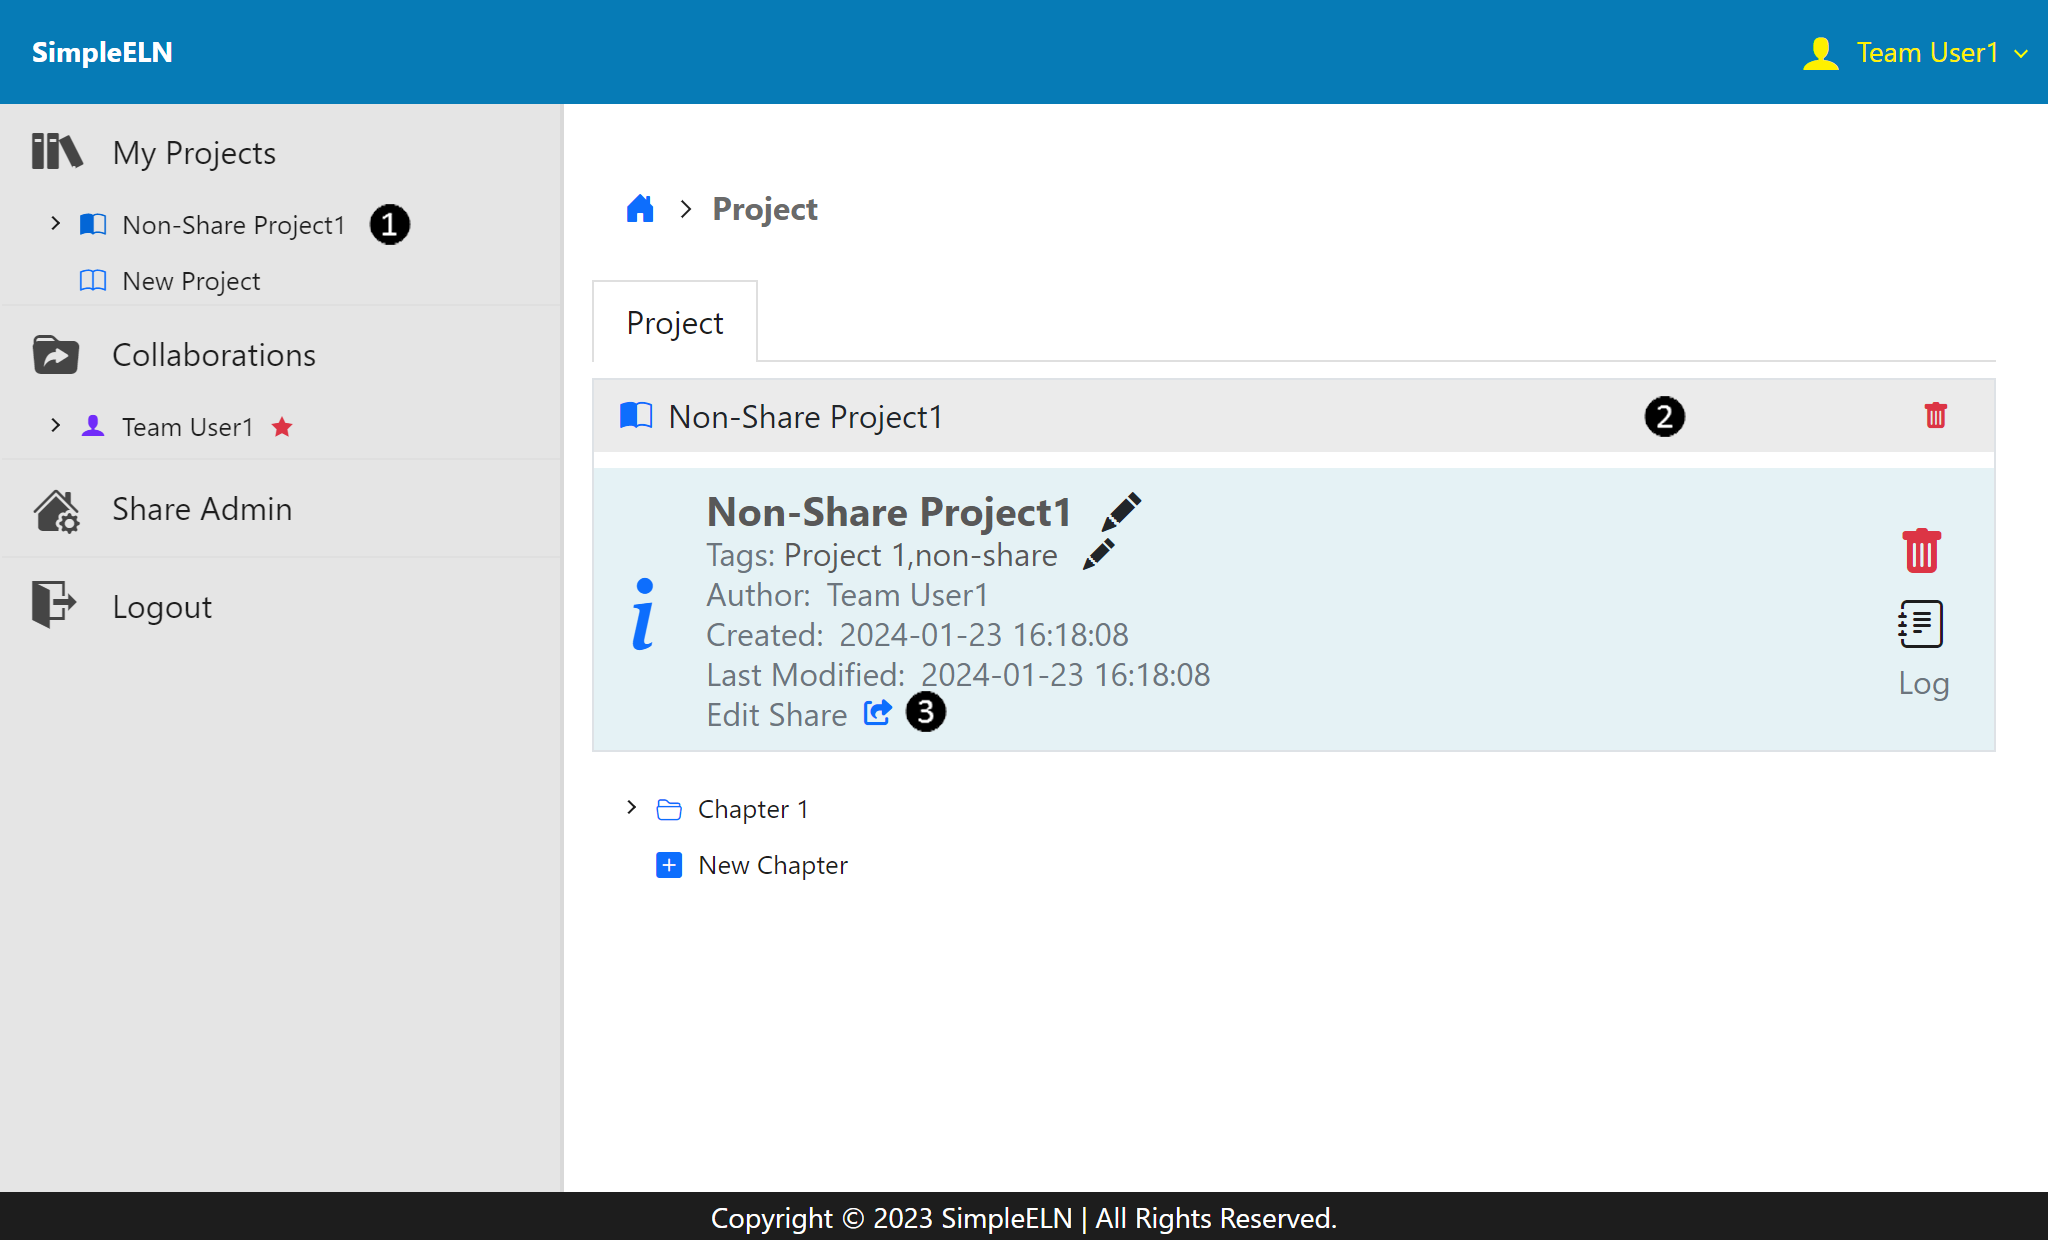
From the left navigation panel, select My ProjectsProject Title in sequence to redirect to the project details page.
Under the Project tab, click on the Project Title to show the project annotations.
Click on the Edit Share icon to show the share configuration page.
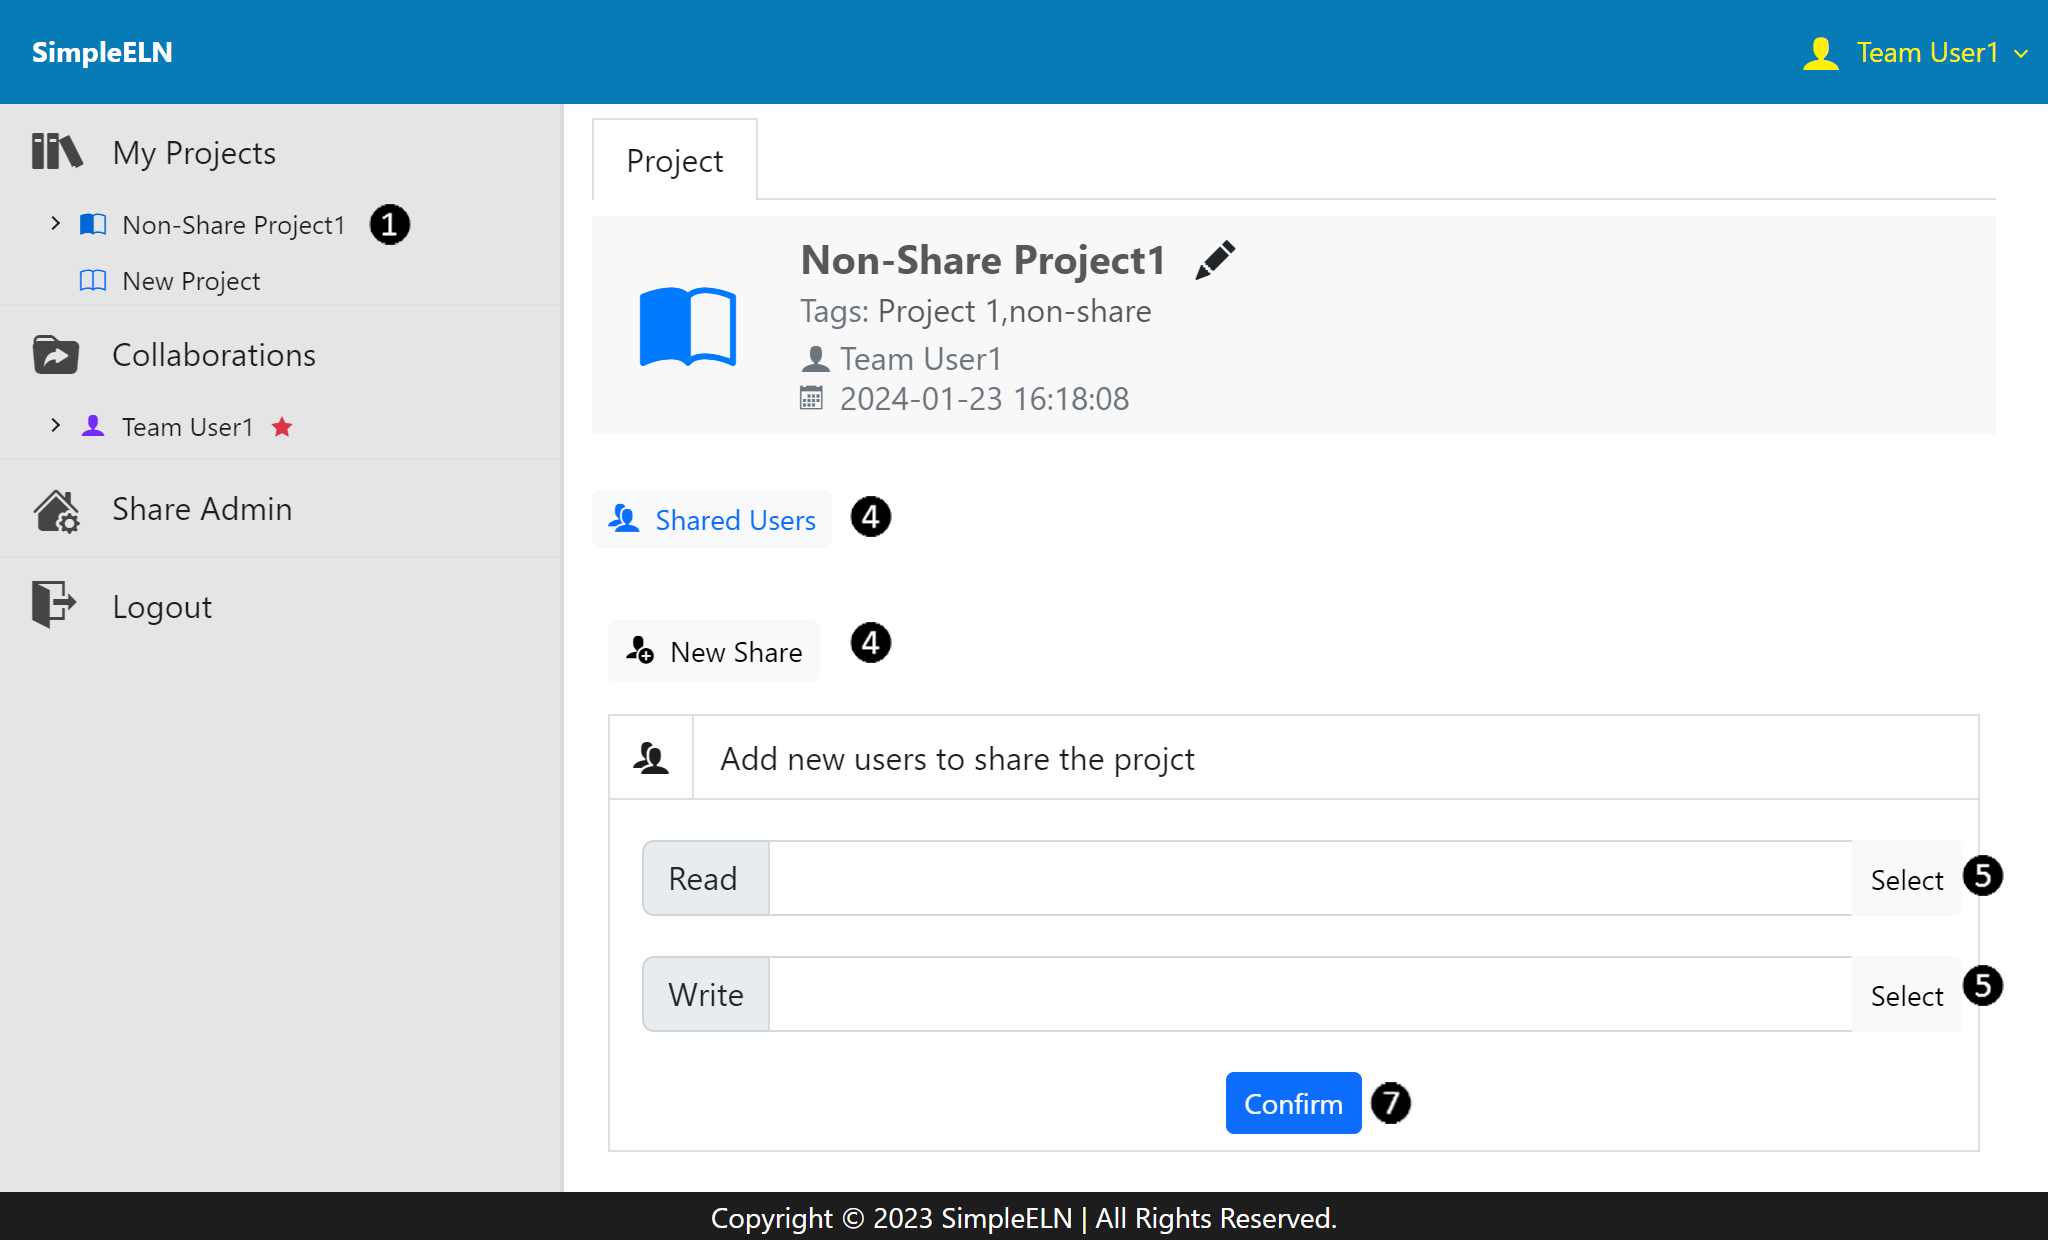
Under the Project tab, click on the Shared Users, and then New Share to share the project with other users.
Click on Select button to choose and configure the user to have either read-only/comment or read-write/comment permissions on the project.
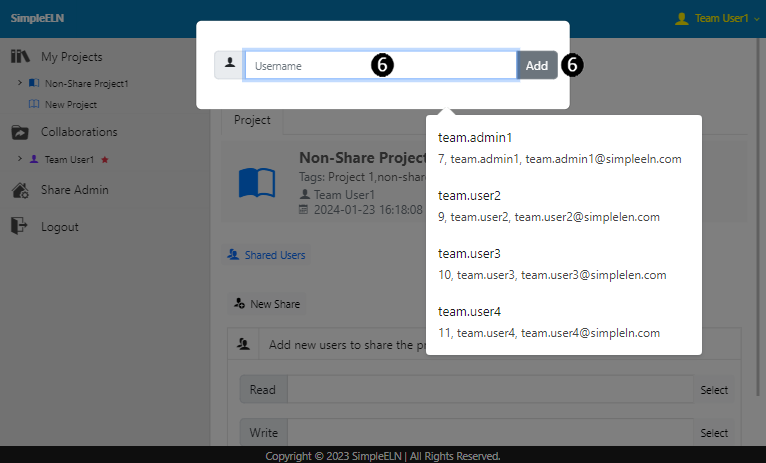
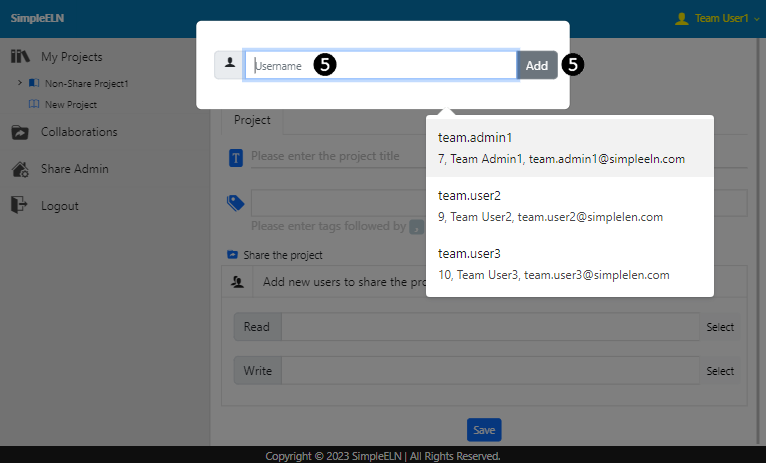
Enter the username, then click the Add button. Note: Only team members from the same team as the logged-in user are displayed in the dropdown list. For users from different teams, please enter their usernames directly.
Option 2: Share a Non-Shared Project via Share Admin Entry
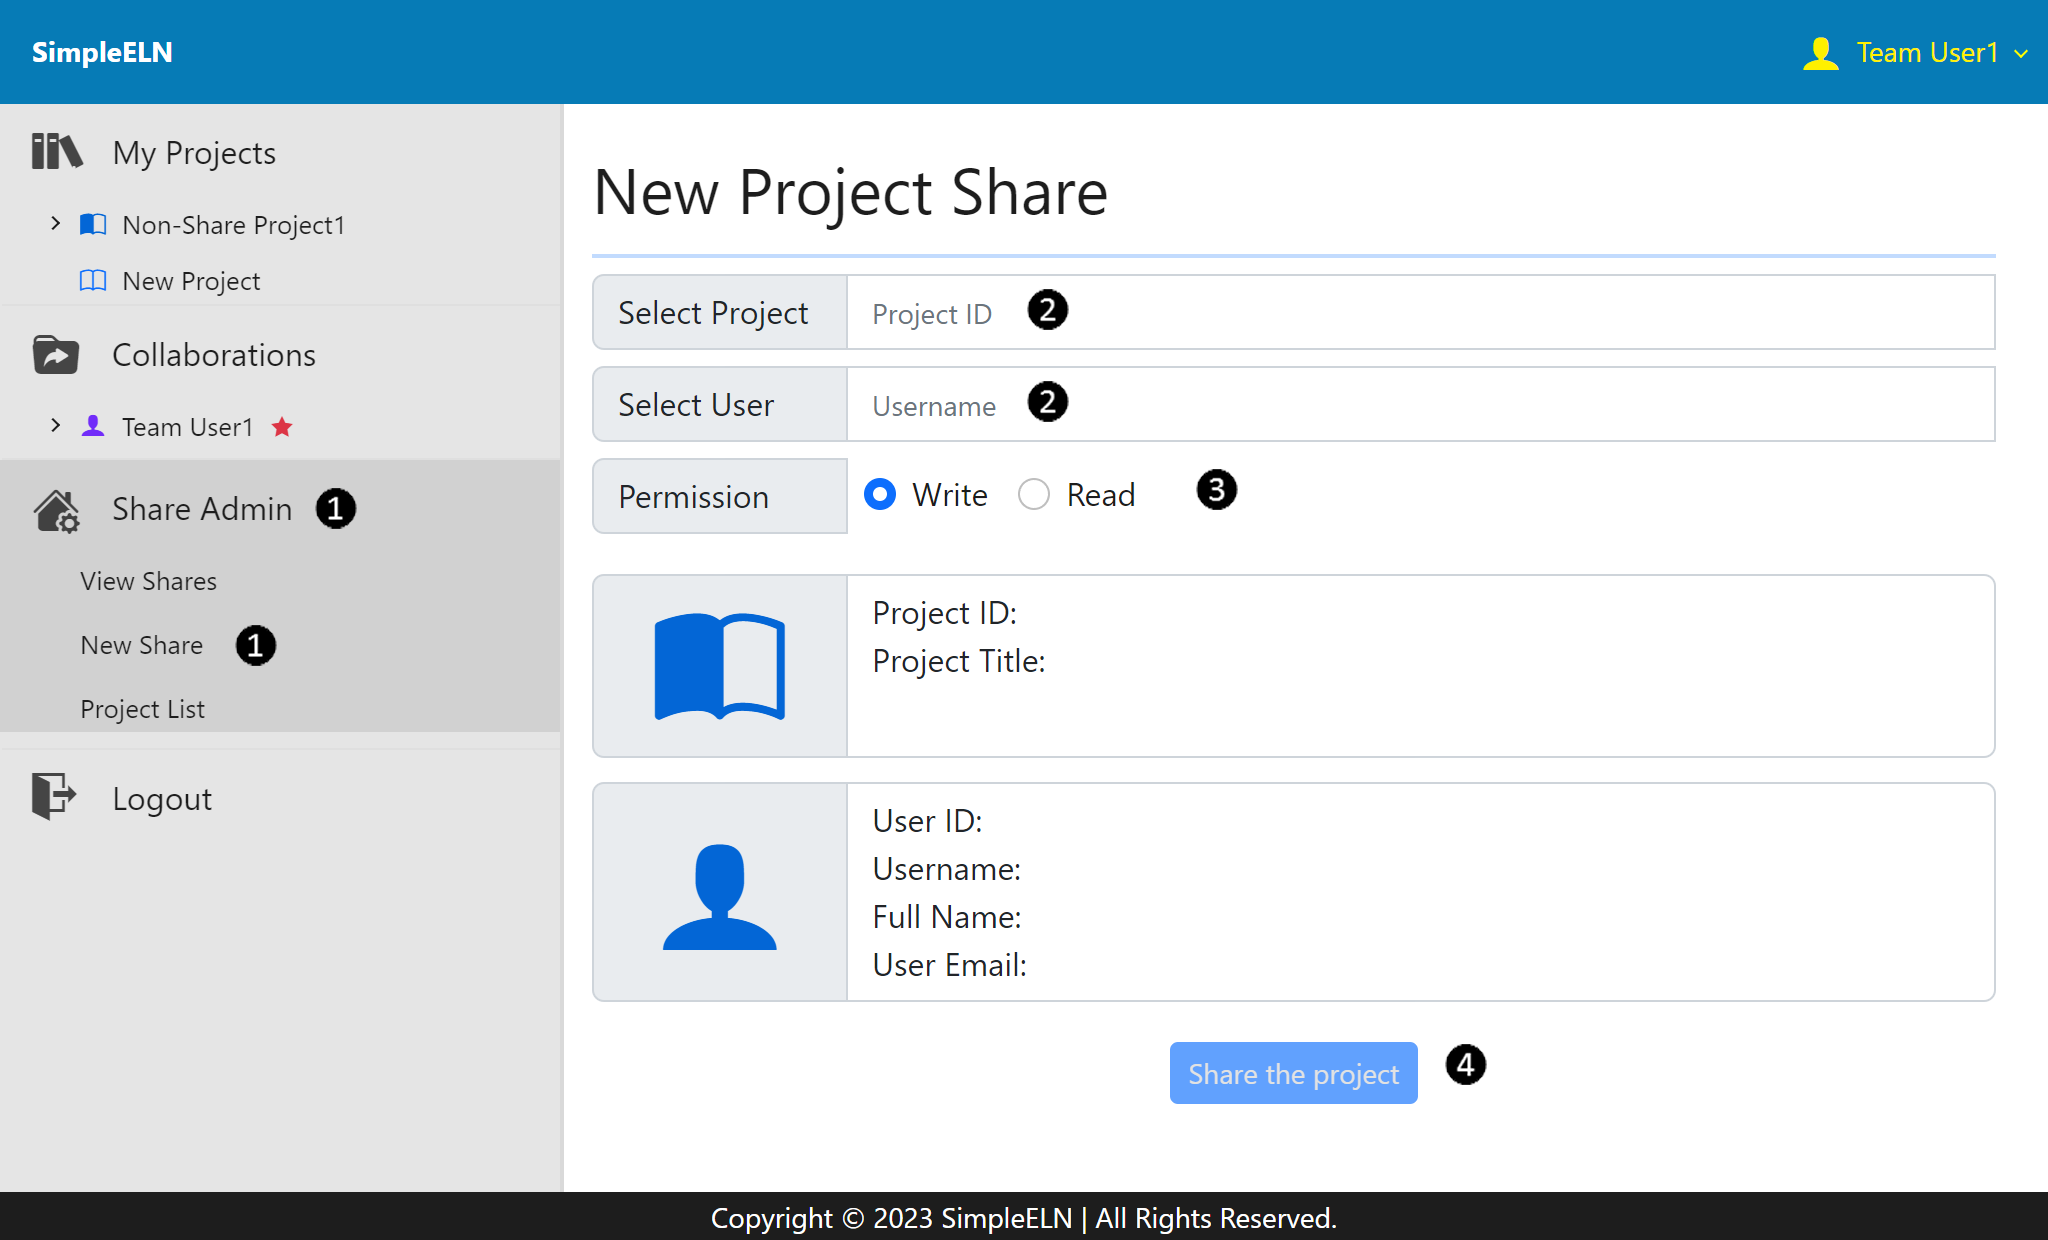
From the left navigation panel, select Share AdminNew Share in sequence to redirect to the New Project Share page.
Select the Project from the dropdown list for sharing.
Enter the Username for sharing. Note: Only team members from the same team as the logged-in user are displayed in the dropdown list. For users from different teams, please enter their usernames directly.
Select the Sharing Permission checkbox.
Click on the Share the project button to add the sharing permission.
The creator creates a new shared project, which is not visible to other team members who have not been granted shared access permissions. However, the team administrator of the creator’s team has read-only/comment permissions on this project, even if it is not explicitly shared with them.
From the left navigation panel, click on New Project to redirect to the Create New Project page.
Option 1: From the left navigation panel, select My ProjectsNew Project in sequence.
Option 2: From the left navigation panel, select CollaborationsUser NameNew Project in sequence.
Under the Project tab, complete the Title and Tags form fields.
Click on Share the project button to share the project with other users.
Click on Select button to choose and configure the user to have either read-only/comment or read-write/comment permissions on the project.
Enter the username, then click the Add button. Note: Only team members from the same team as the logged-in user are displayed in the dropdown list. For users from different teams, please enter their usernames directly.
Submit the form.
Please refer to the reference Create a Shared Project for detailed step-by-step instructions on how to create a new shared project.
Note: The sharing accesses are specified at the project level, please refer to the reference Notebook Creation for entering additional data for a new project.
If a shared project exists, the creator of the project can set read-only/comment or read-write/comment permissions for specific team members. Even if the project is not shared with the team administrator of the creator’s team, the team administrator still has read-only/comment permissions on the project. Please adhere to the instructions below to configure the sharing accesses for the project:
Option 1: Share a Shared Project via Collaborations Entry
From the left navigation panel, select CollaborationsUser NameProject Title in sequence to redirect to the project details page.
Under the Project tab, click on the Project Title to show the project annotations.
Click on the Edit Share icon to show the share configuration page.
Under the Project tab, click on the Shared Users, and then New Share to share the project with other users.
Click on Select button to choose and configure the user to have either read-only/comment or read-write/comment permissions on the project.
Enter the username, then click the Add button. Note: Only team members from the same team as the logged-in user are displayed in the dropdown list. For users from different teams, please enter their usernames directly.
Submit the form.
Please refer to the reference Share a Shared Project for detailed step-by-step instructions.
Option 2: Share a Shared Project via Share Admin Entry
From the left navigation panel, select Share AdminNew Share in sequence to redirect to the New Project Share page.
Select the Project from the dropdown list for sharing.
Enter the Username for sharing. Note: Enter usernames directly for users not from the same team as the logged-in user.
Select the Sharing Permission checkbox.
Click on the Share the project button to add the sharing permission.
Please refer to the reference Share a Shared Project for detailed step-by-step instructions.
1.5.3.3.3. Edit Sharing Permissions for an Existing Project
For an existing project, solely the project creator has the ability to modify sharing permissions for designated team members as necessary. The project remains invisible to other team members who haven’t been granted shared access. Even if the project is not shared with the team administrator of the creator’s team, the team administrator still has read-only/comment permissions on the project.
1.5.3.3.3.1. Add Sharing Permissions for an Existing Project
Option 1: Add Sharing Permissions via Edit Share Entry
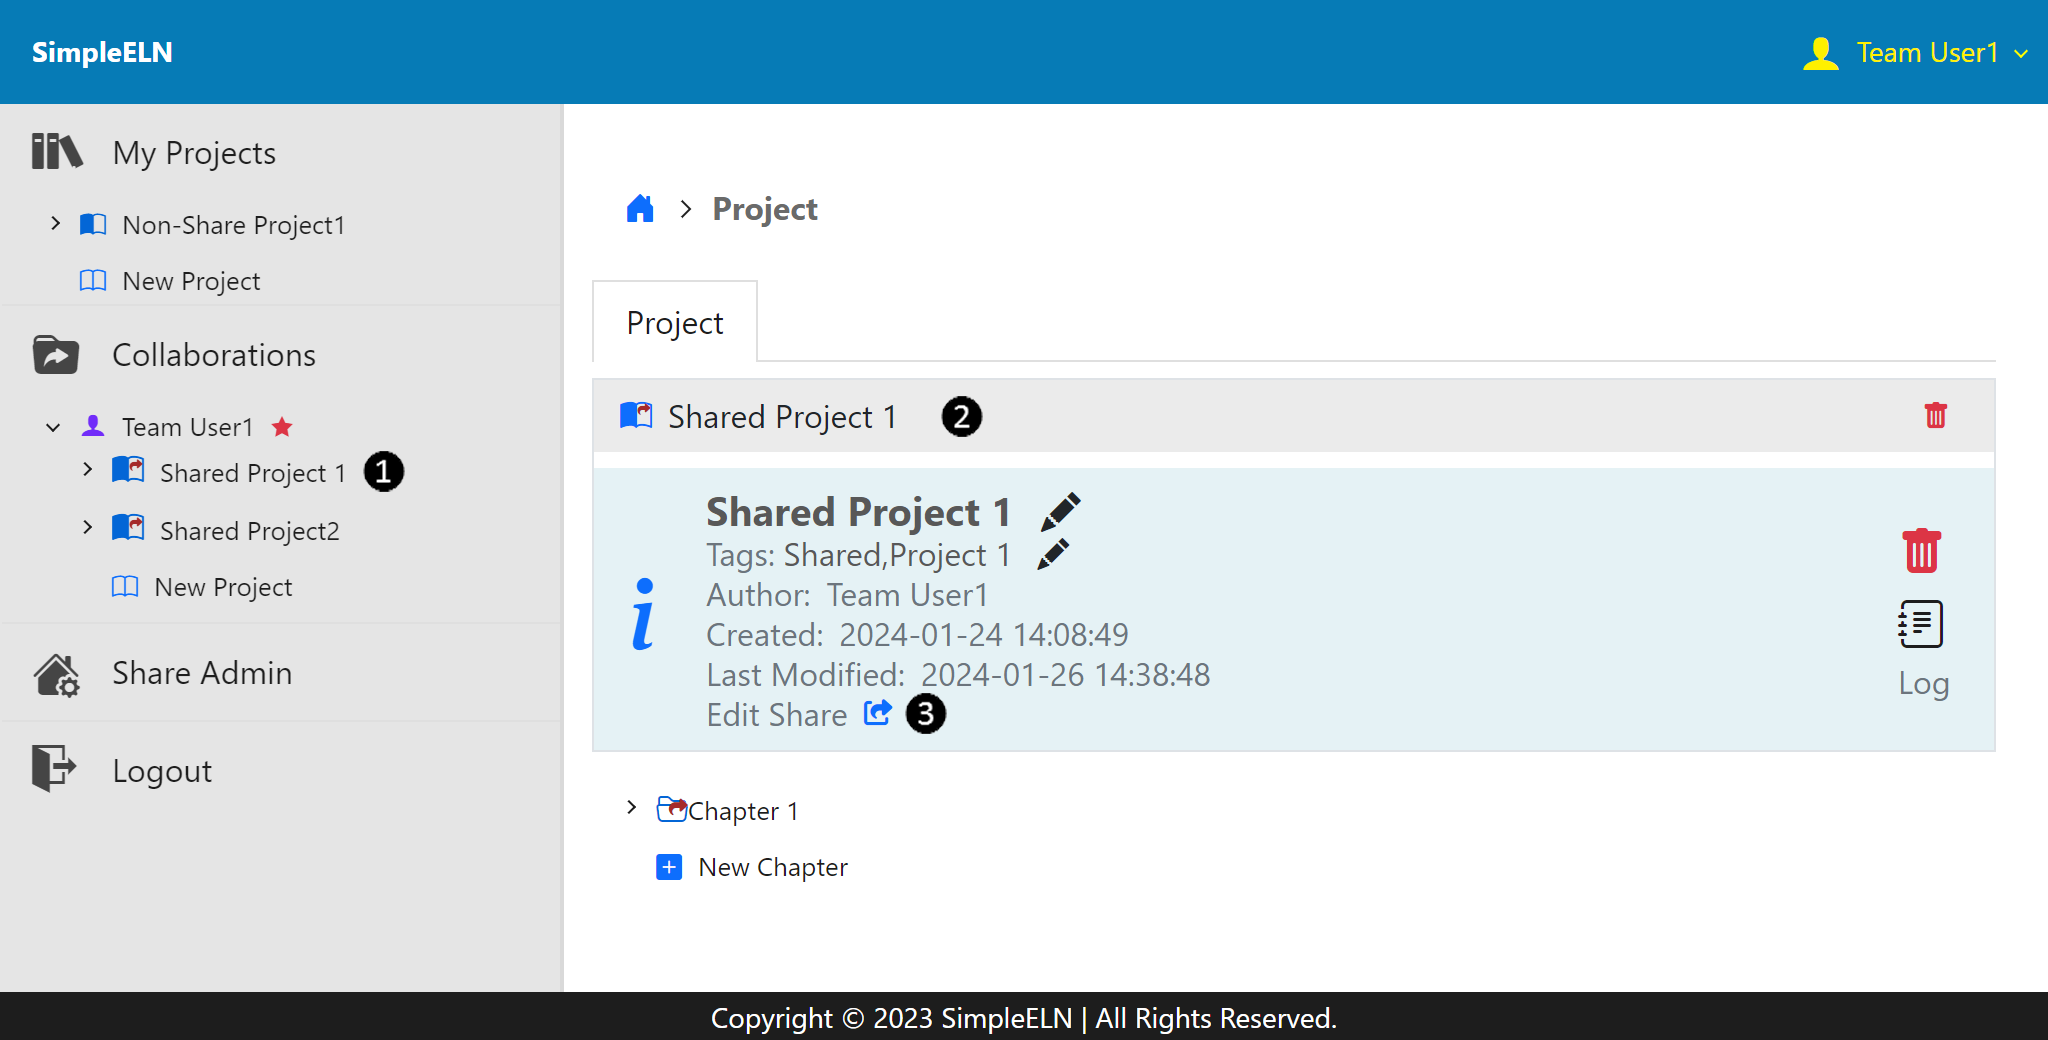
From the left navigation panel, click on Project Title to redirect to the project details page.
Option 1: From the left navigation panel, select My ProjectsProject Title in sequence.
Option 2: From the left navigation panel, select CollaborationsUser NameProject Title in sequence.
Under the Project tab, click on the Project Title to show the project annotations.
Click on the Edit Share icon to show the share configuration page.
Under the Project tab, click on the Shared Users, and then New Share to share the project with other users.
Click on Select button to choose and configure the user to have either read-only/comment or read-write/comment permissions on the project.
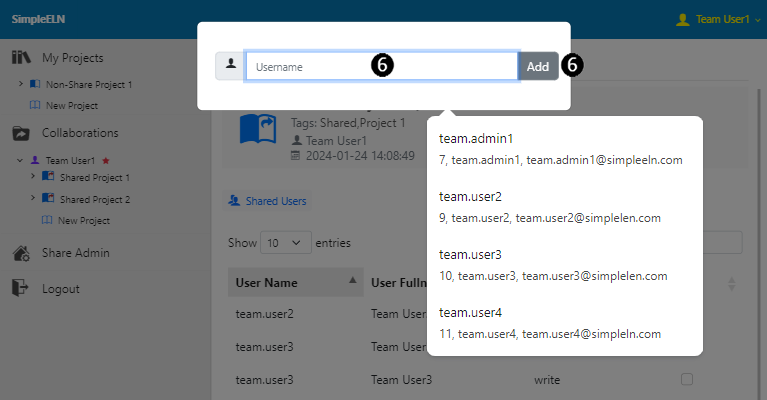
Enter the username, then click the Add button. Note: Only team members from the same team as the logged-in user are displayed in the dropdown list. For users from different teams, please enter their usernames directly.
Fig. 1.94 Enter the username to share the project. Note: Only team members from the same team as the logged-in user are displayed in the dropdown list. For users from different teams, please enter their usernames directly.
Share an Existing Non-Shared Project via Share Admin Entry
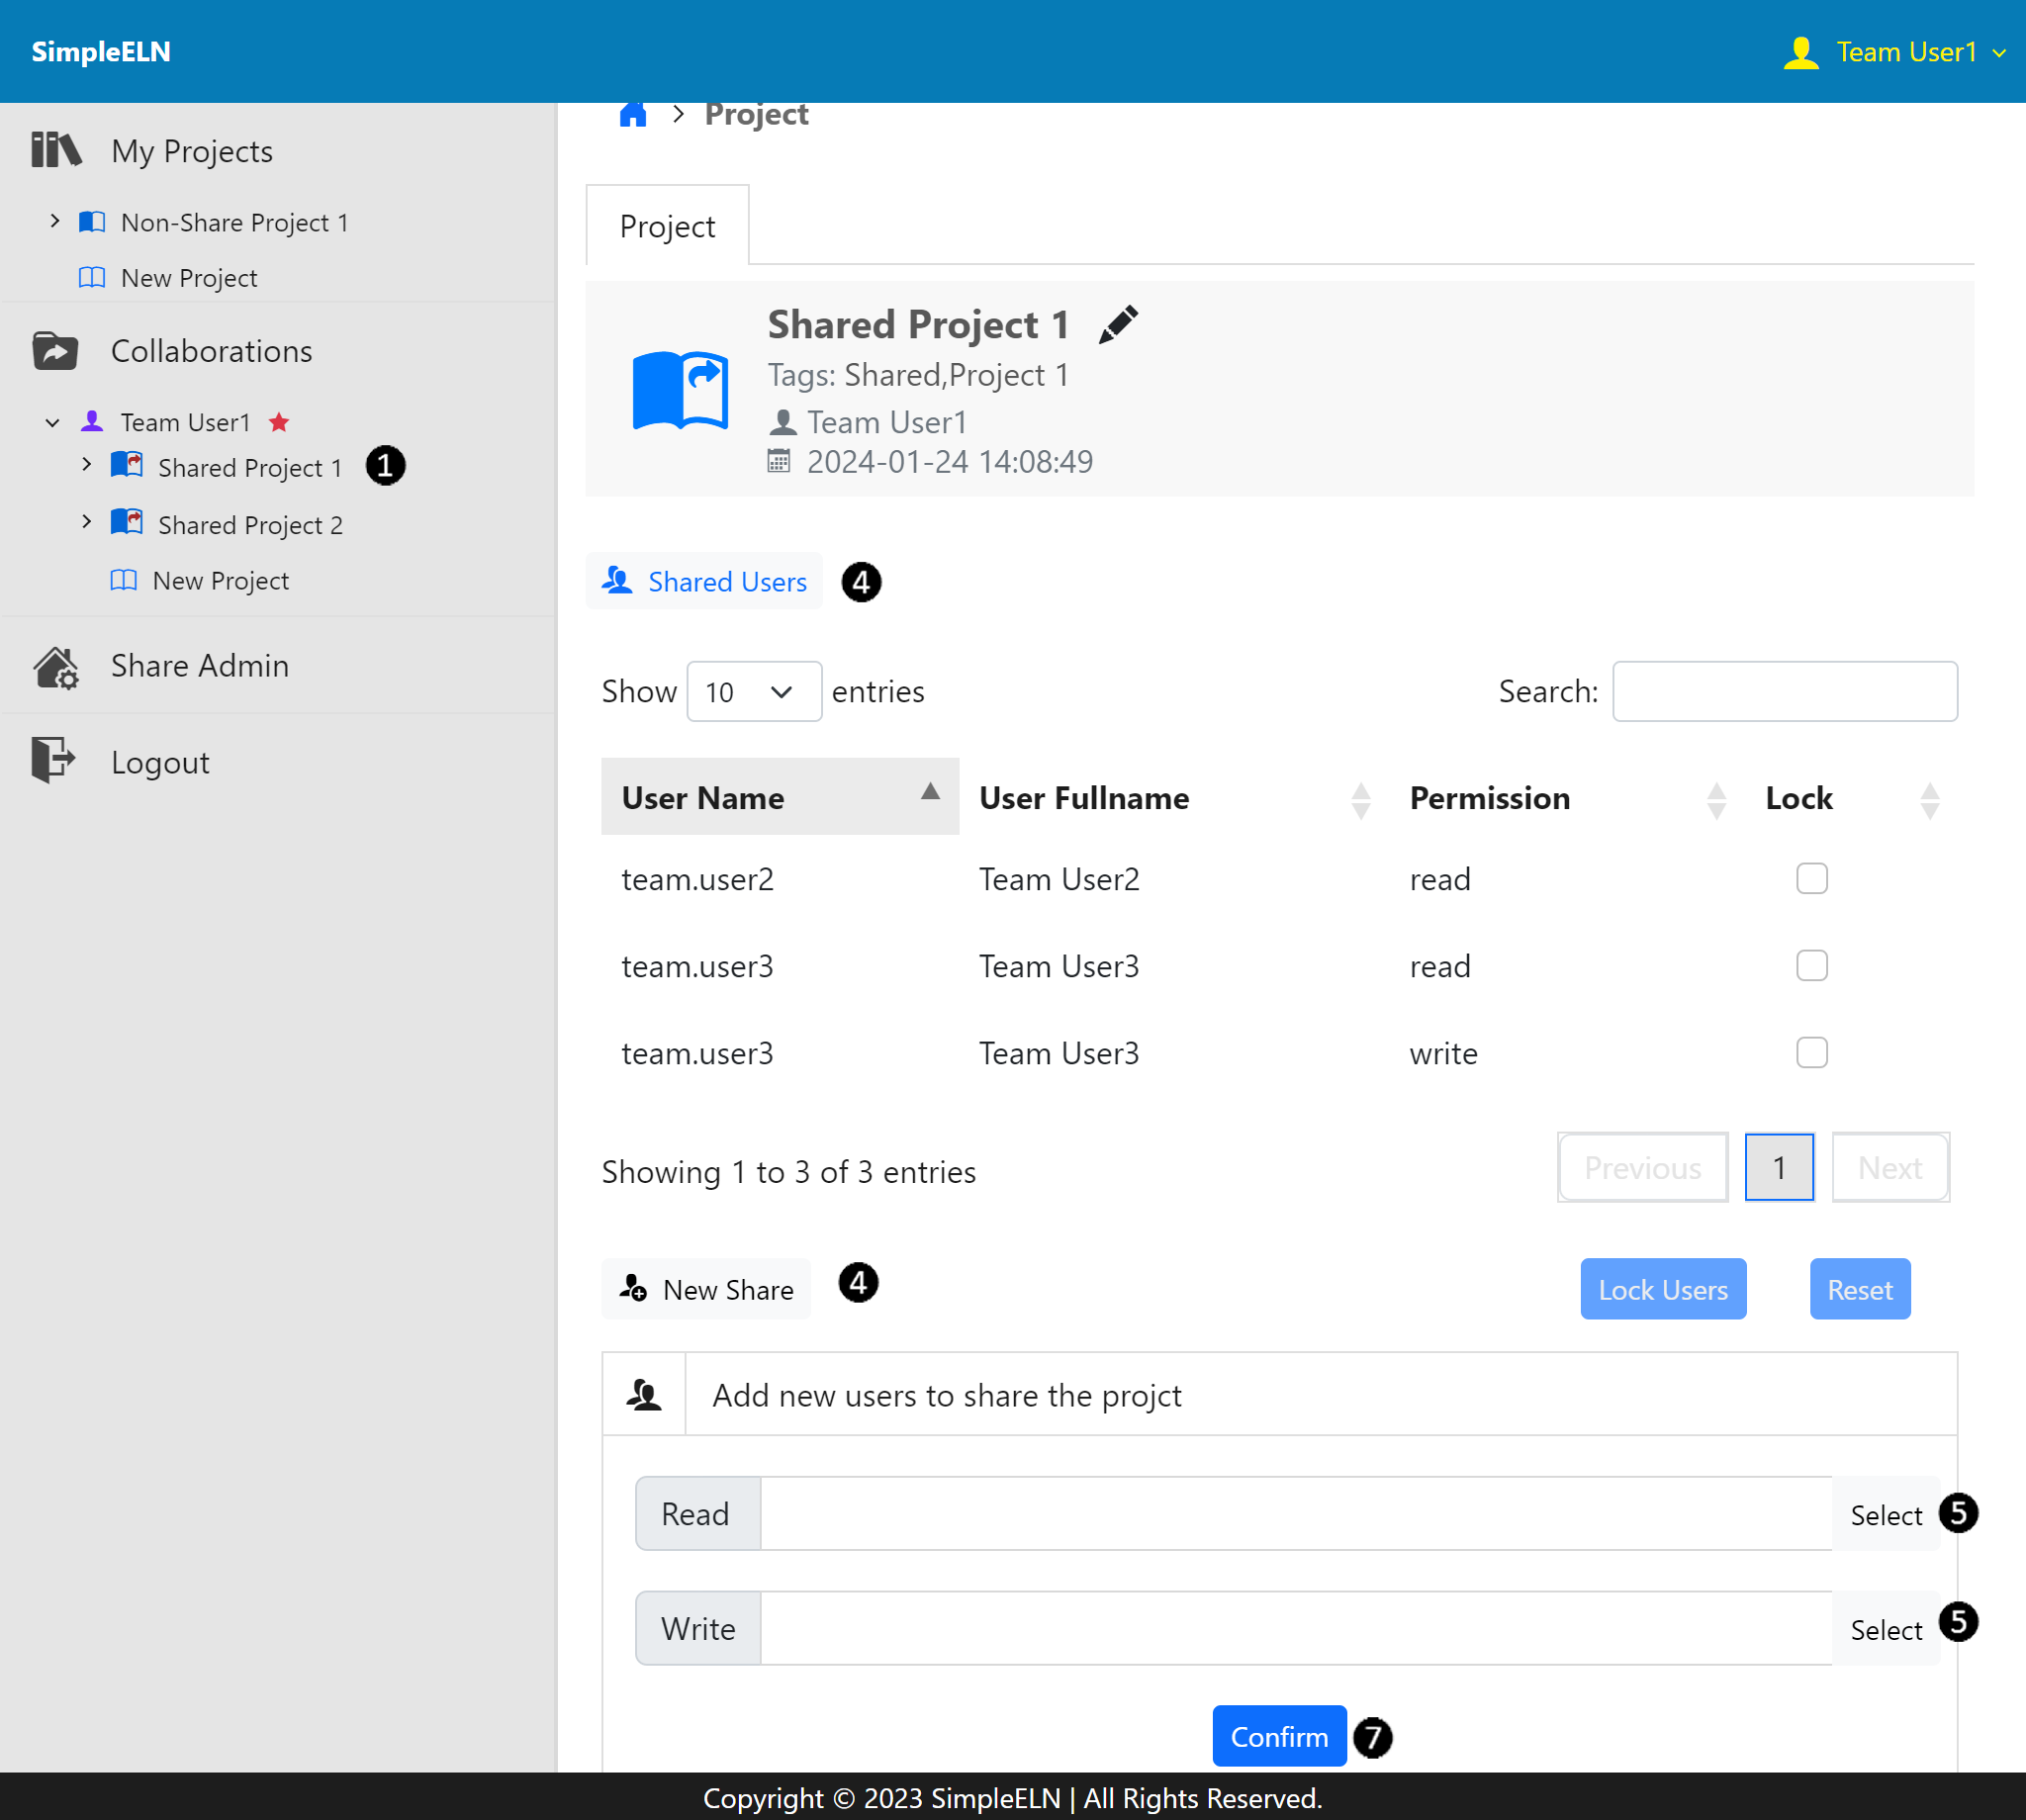
From the left navigation panel, select Share AdminNew Share in sequence to redirect to the New Project Share page. ❶
Select the Project from the dropdown list for sharing. ❷
Enter the Username for sharing. ❷ Note: Enter usernames directly for users not from the same team as the logged-in user.
Select the Sharing Permission checkbox. ❸
Click on the Share the project button to add the sharing permission. ❹
Fig. 1.96 Show the page for adding new sharing access. Note: Only team members from the same team as the logged-in user are displayed in the Select User dropdown list. For users from different teams, please enter their usernames directly.
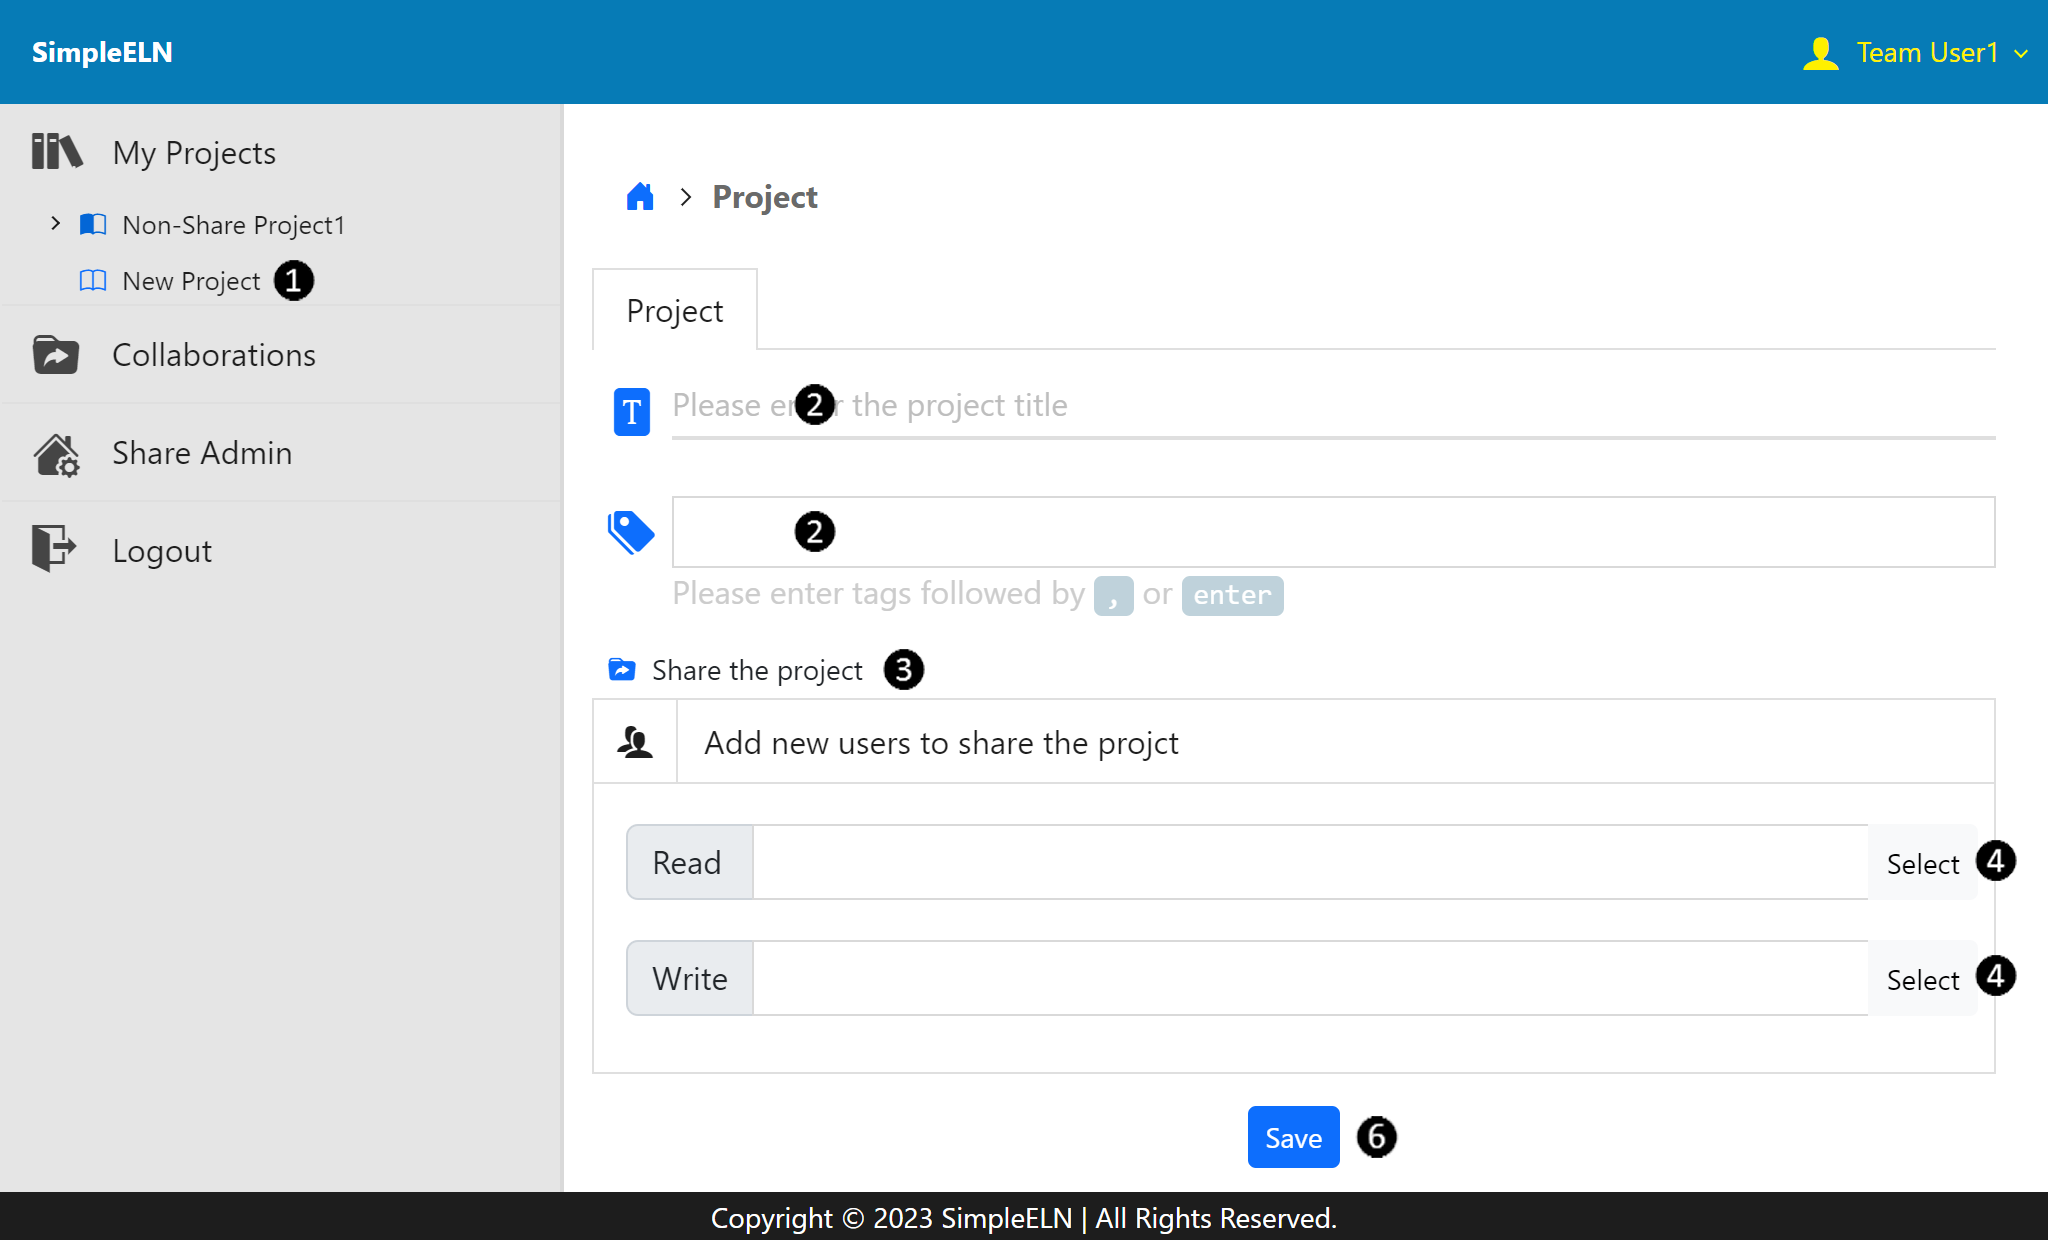
From the left navigation panel, select My ProjectsNew Project in sequence to redirect to the Create New Project page. ❶
Under the Project tab, complete the Title and Tags form fields. ❷
Click on Share the project button to share the project with other users. ❸
Click on Select button to choose and configure the user to have either read-only/comment or read-write/comment permissions on the project. ❹
Enter the username, then click the Add button. ❺ Note: Enter usernames directly for users not from the same team as the logged-in user.
Submit the form. ❻
Fig. 1.97 Create a new shared project with the share configuration form
Fig. 1.98 Enter the username to share the project. Note: Only team members from the same team as the logged-in user are displayed in the dropdown list. For users from different teams, please enter their usernames directly.
Fig. 1.101 Enter the username to share the project. Note: Only team members from the same team as the logged-in user are displayed in the dropdown list. For users from different teams, please enter their usernames directly.
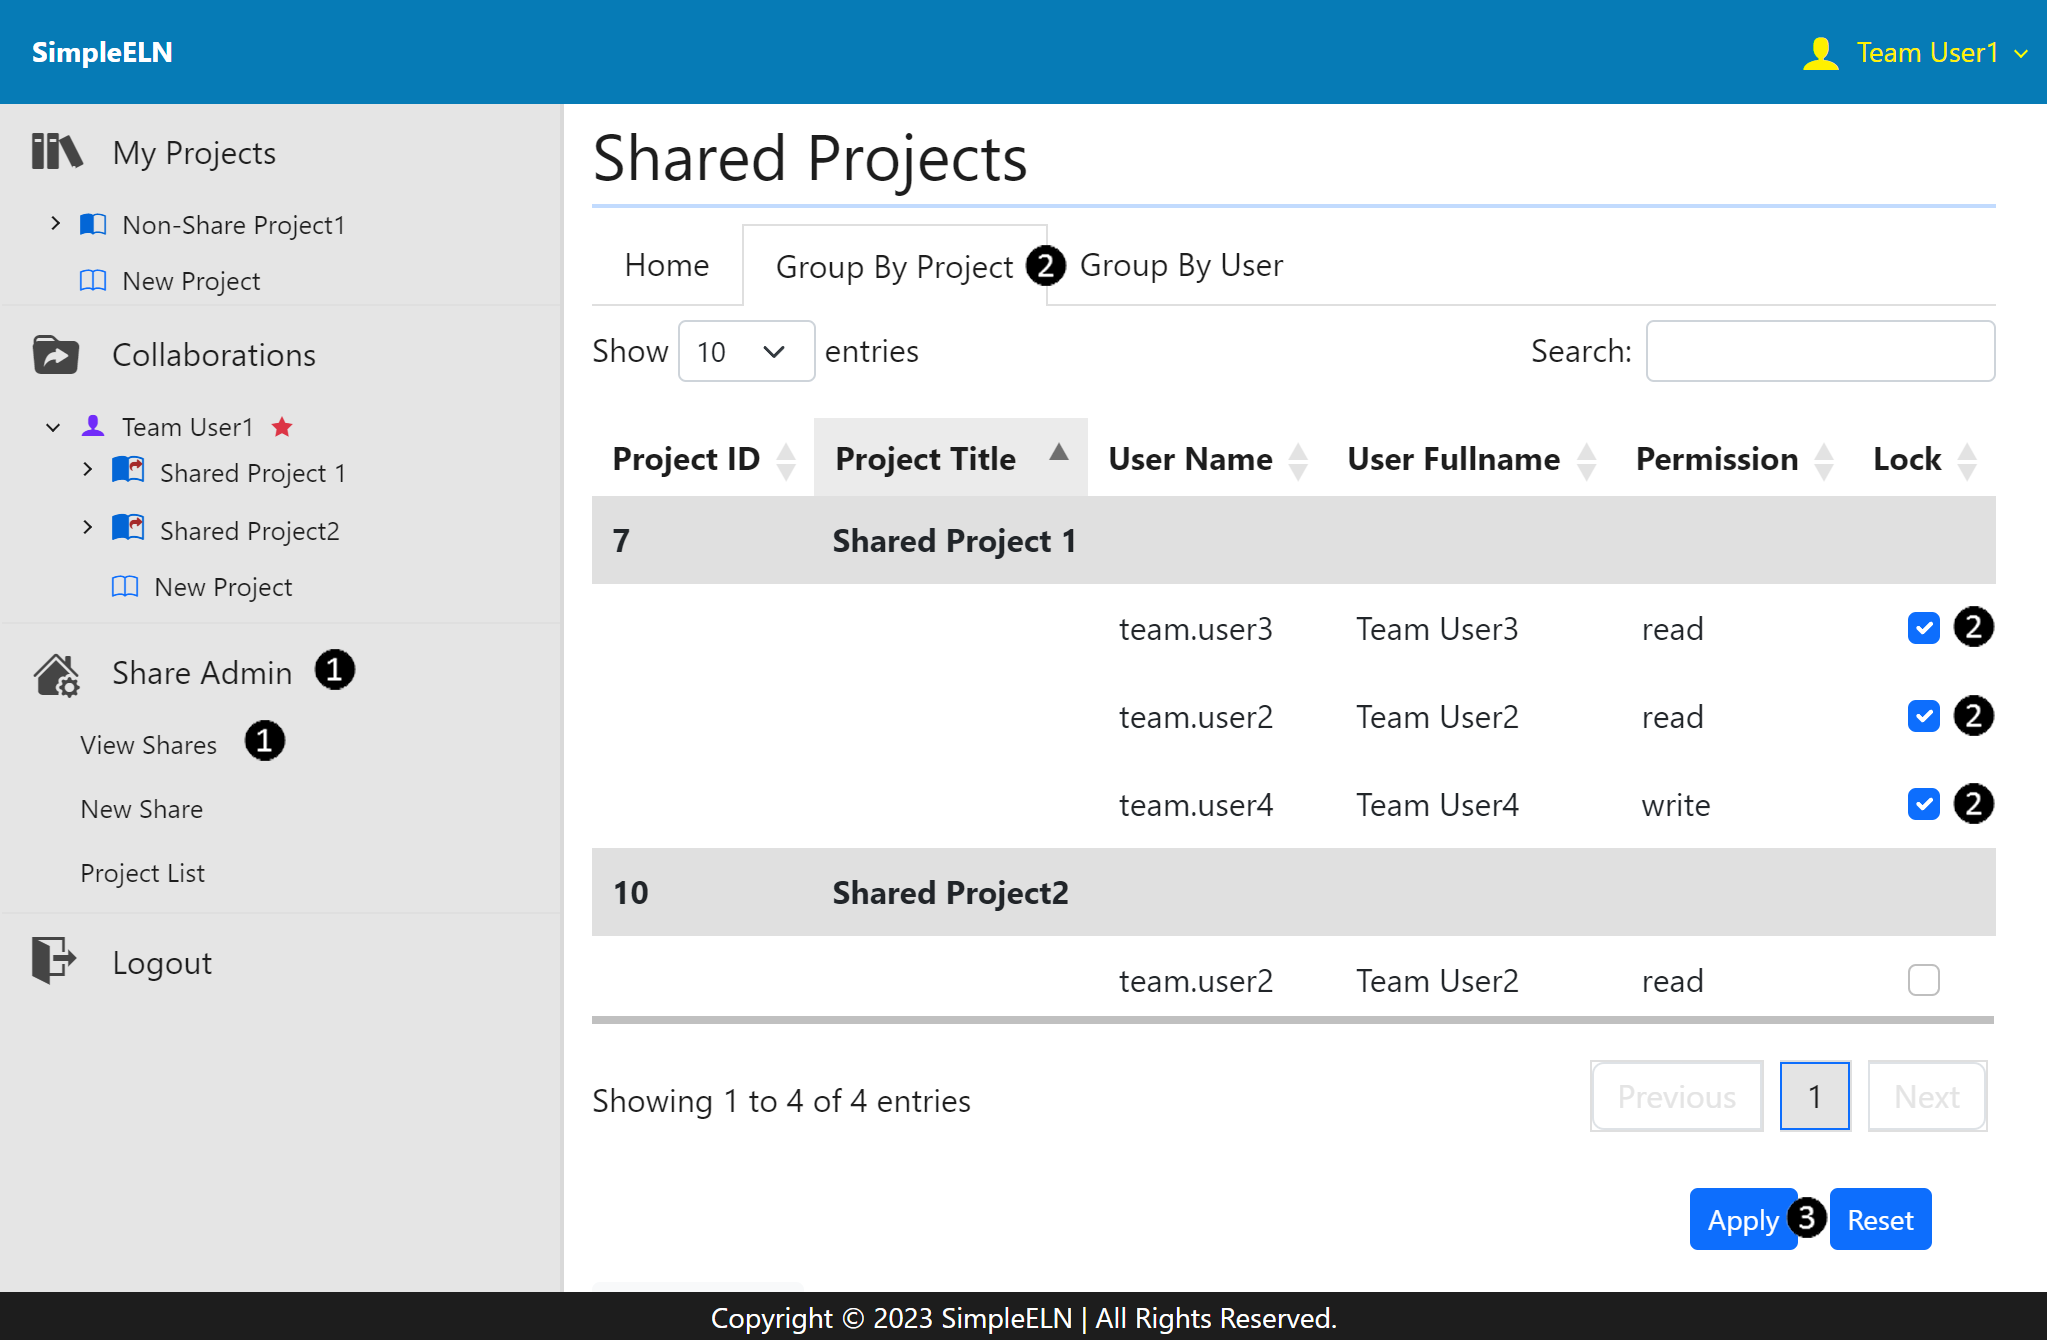
Share an Existing Shared Project via Share Admin Entry
From the left navigation panel, select Share AdminNew Share in sequence to redirect to the New Project Share page. ❶
Select the Project from the dropdown list for sharing. ❷
Enter the Username for sharing. ❷ Note: Enter usernames directly for users not from the same team as the logged-in user.
Select the Sharing Permission checkbox. ❸
Click on the Share the project button to add the sharing permission. ❹
Fig. 1.103 Show the page for adding new sharing access. Note: Only team members from the same team as the logged-in user are displayed in the Select User dropdown list. For users from different teams, please enter their usernames directly.
1.5.3.4.5. Add Sharing Permissions for an Existing Project
Add Sharing Permissions for a Non-Shared Project via My Projects Entry
Fig. 1.106 Enter the username to share the project. Note: Only team members from the same team as the logged-in user are displayed in the dropdown list. For users from different teams, please enter their usernames directly.
Add Sharing Permissions for a Shared Project via Collaborations Entry
Fig. 1.109 Enter the username to share the project. Note: Only team members from the same team as the logged-in user are displayed in the dropdown list. For users from different teams, please enter their usernames directly.
Add Sharing Permissions via Share Admin Entry
From the left navigation panel, select Share AdminNew Share in sequence to redirect to the New Project Share page. ❶
Select the Project from the dropdown list for sharing. ❷
Enter the Username for sharing. ❷ Note: Enter usernames directly for users not from the same team as the logged-in user.
Select the Sharing Permission checkbox. ❸
Click on the Share the project button to add the sharing permission. ❹
Fig. 1.111 Show the page for adding new sharing access. Note: Only team members from the same team as the logged-in user are displayed in the Select User dropdown list. For users from different teams, please enter their usernames directly.
1.5.3.4.6. Remove Sharing Permissions for an Existing Project
Remove Sharing Permissions via Edit Share Entry
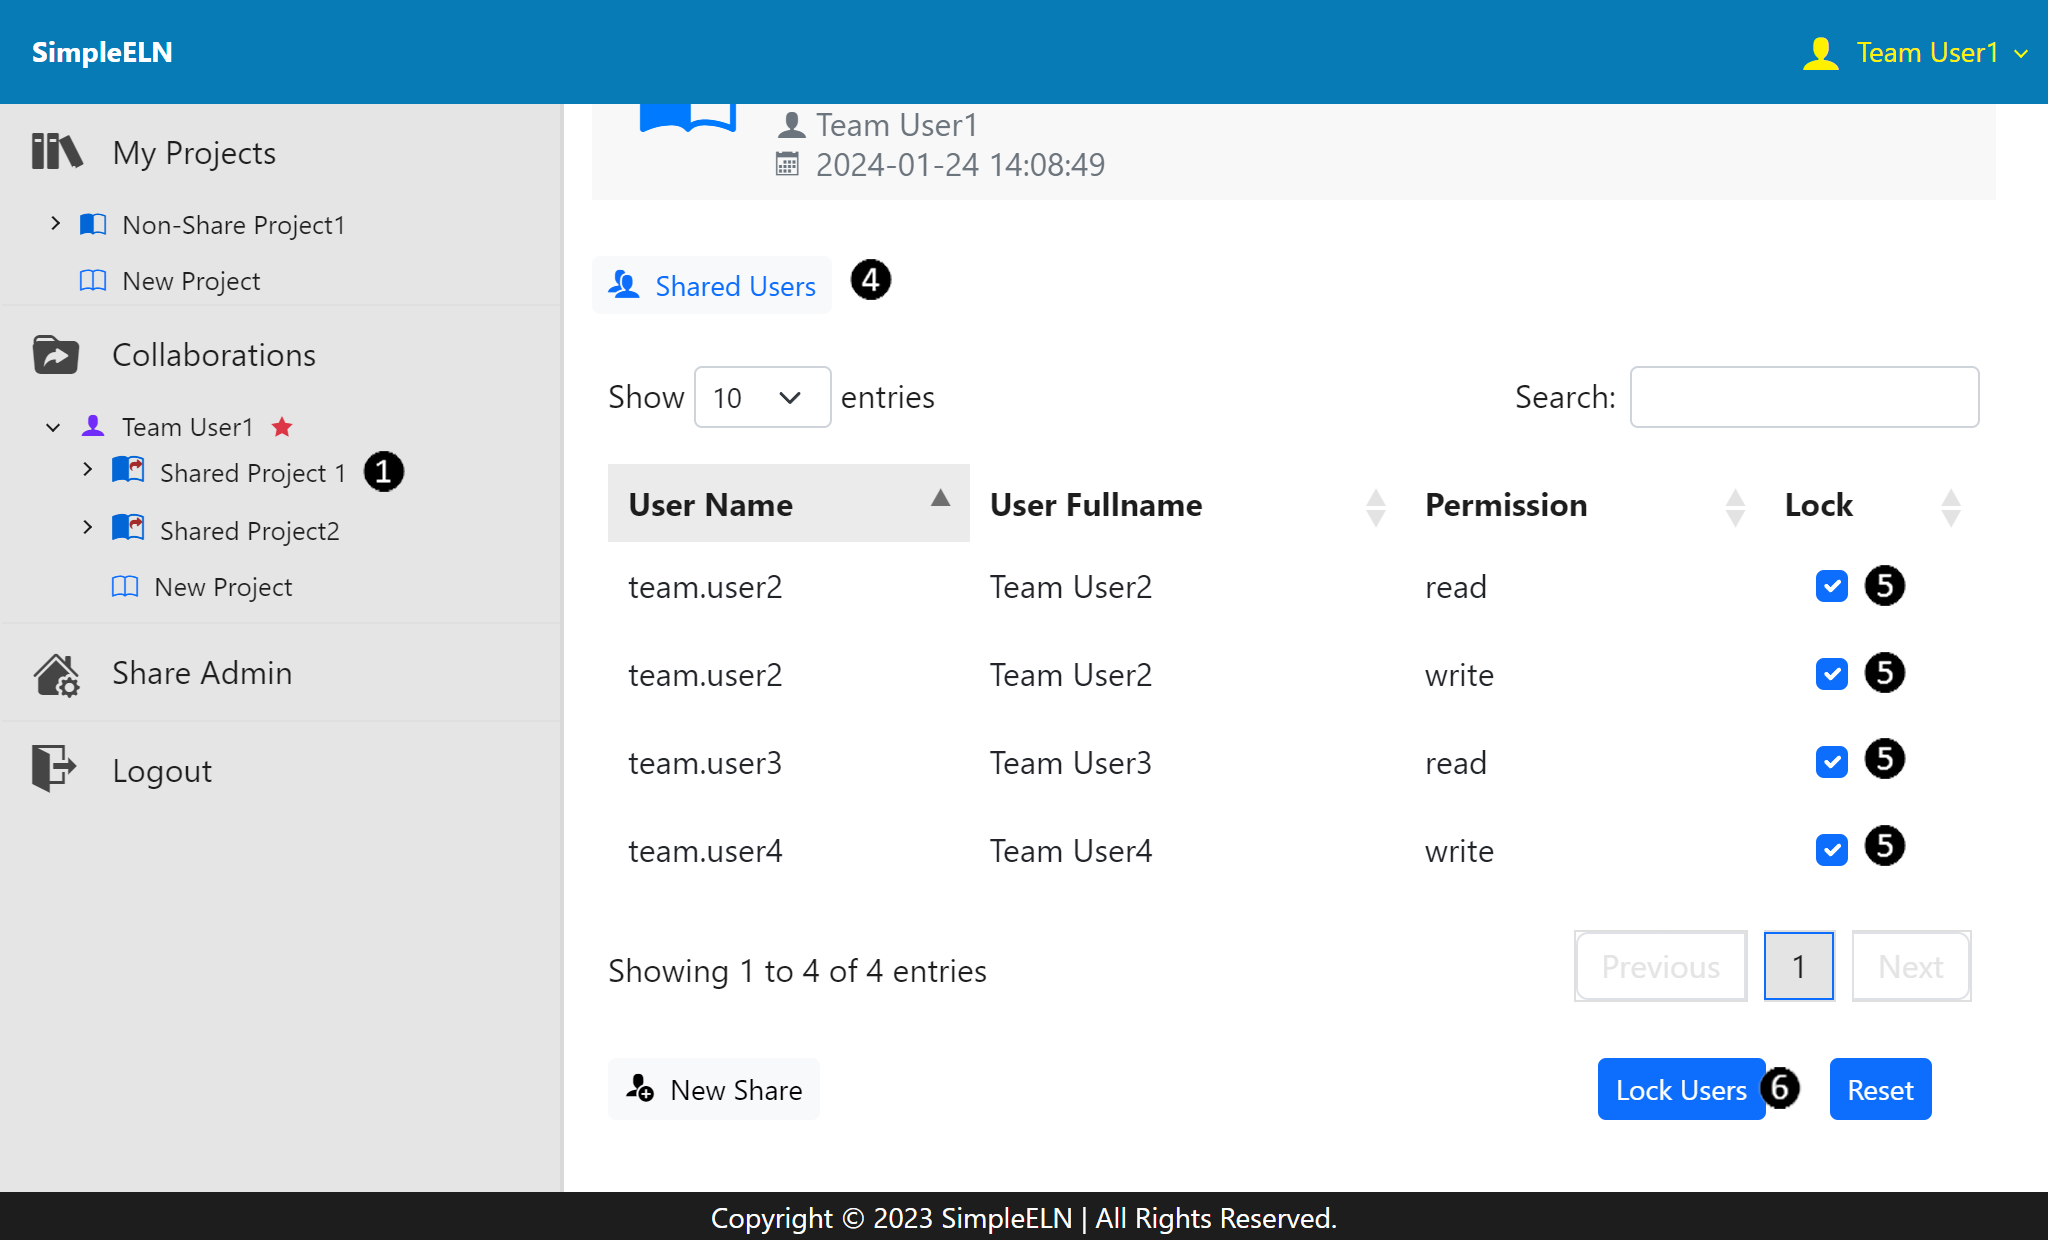
From the left navigation panel, select CollaborationsUser NameProject Title in sequence. ❶
Under the Project tab, click on the Project Title to show the project annotations. ❷
Click on the Edit Share icon to show the share configuration page. ❸
Under the Project tab, click on the Shared Users to show the sharing permissions. ❹
Check the Lock checkbox to disable the user’s sharing access. ❺
Click the Lock Users button to confirm the changes to sharing permissions. ❻
Fig. 1.115 Show the page for disabling sharing access
1.5.3.4.7. Overview of Shared Projects for Two Demo Teams
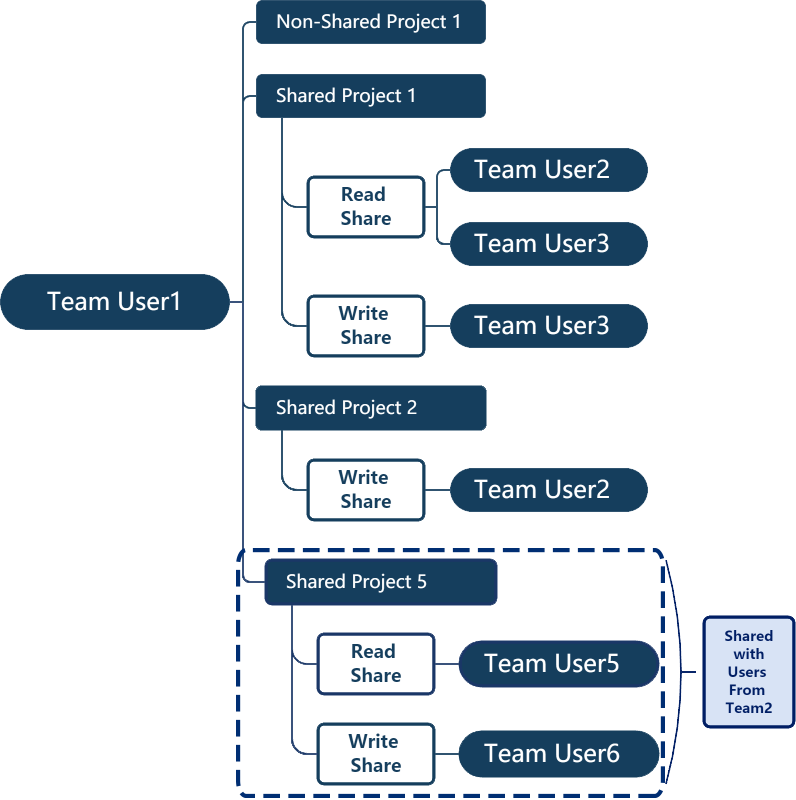
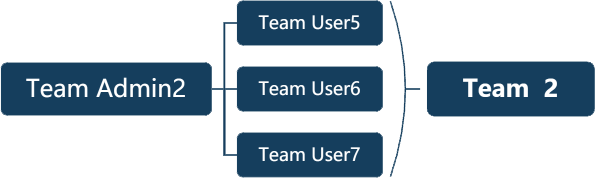
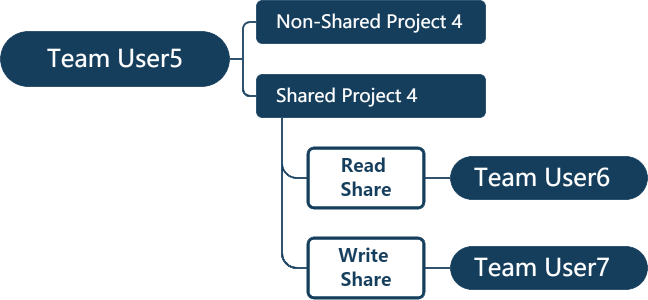
To streamline project sharing within the SimpleELN MultiTeam Edition, we have set up two exemplary teams: Team 1 and Team 2. Team 1 comprises a team administrator account, Team Admin1, and four team user accounts, namely Team User1, Team User2, Team User3, and Team User4. Similarly, Team 2 includes a team administrator account, Team Admin2, along with three team user accounts: Team User5, Team User6, and Team User7. These accounts will serve as demonstrators to show how projects can be shared among team members within this multi-team environment.
Overview of Team1’s Users and Their Associated Projects
Fig. 1.116 Team Member Accounts for a Sample Team Team1
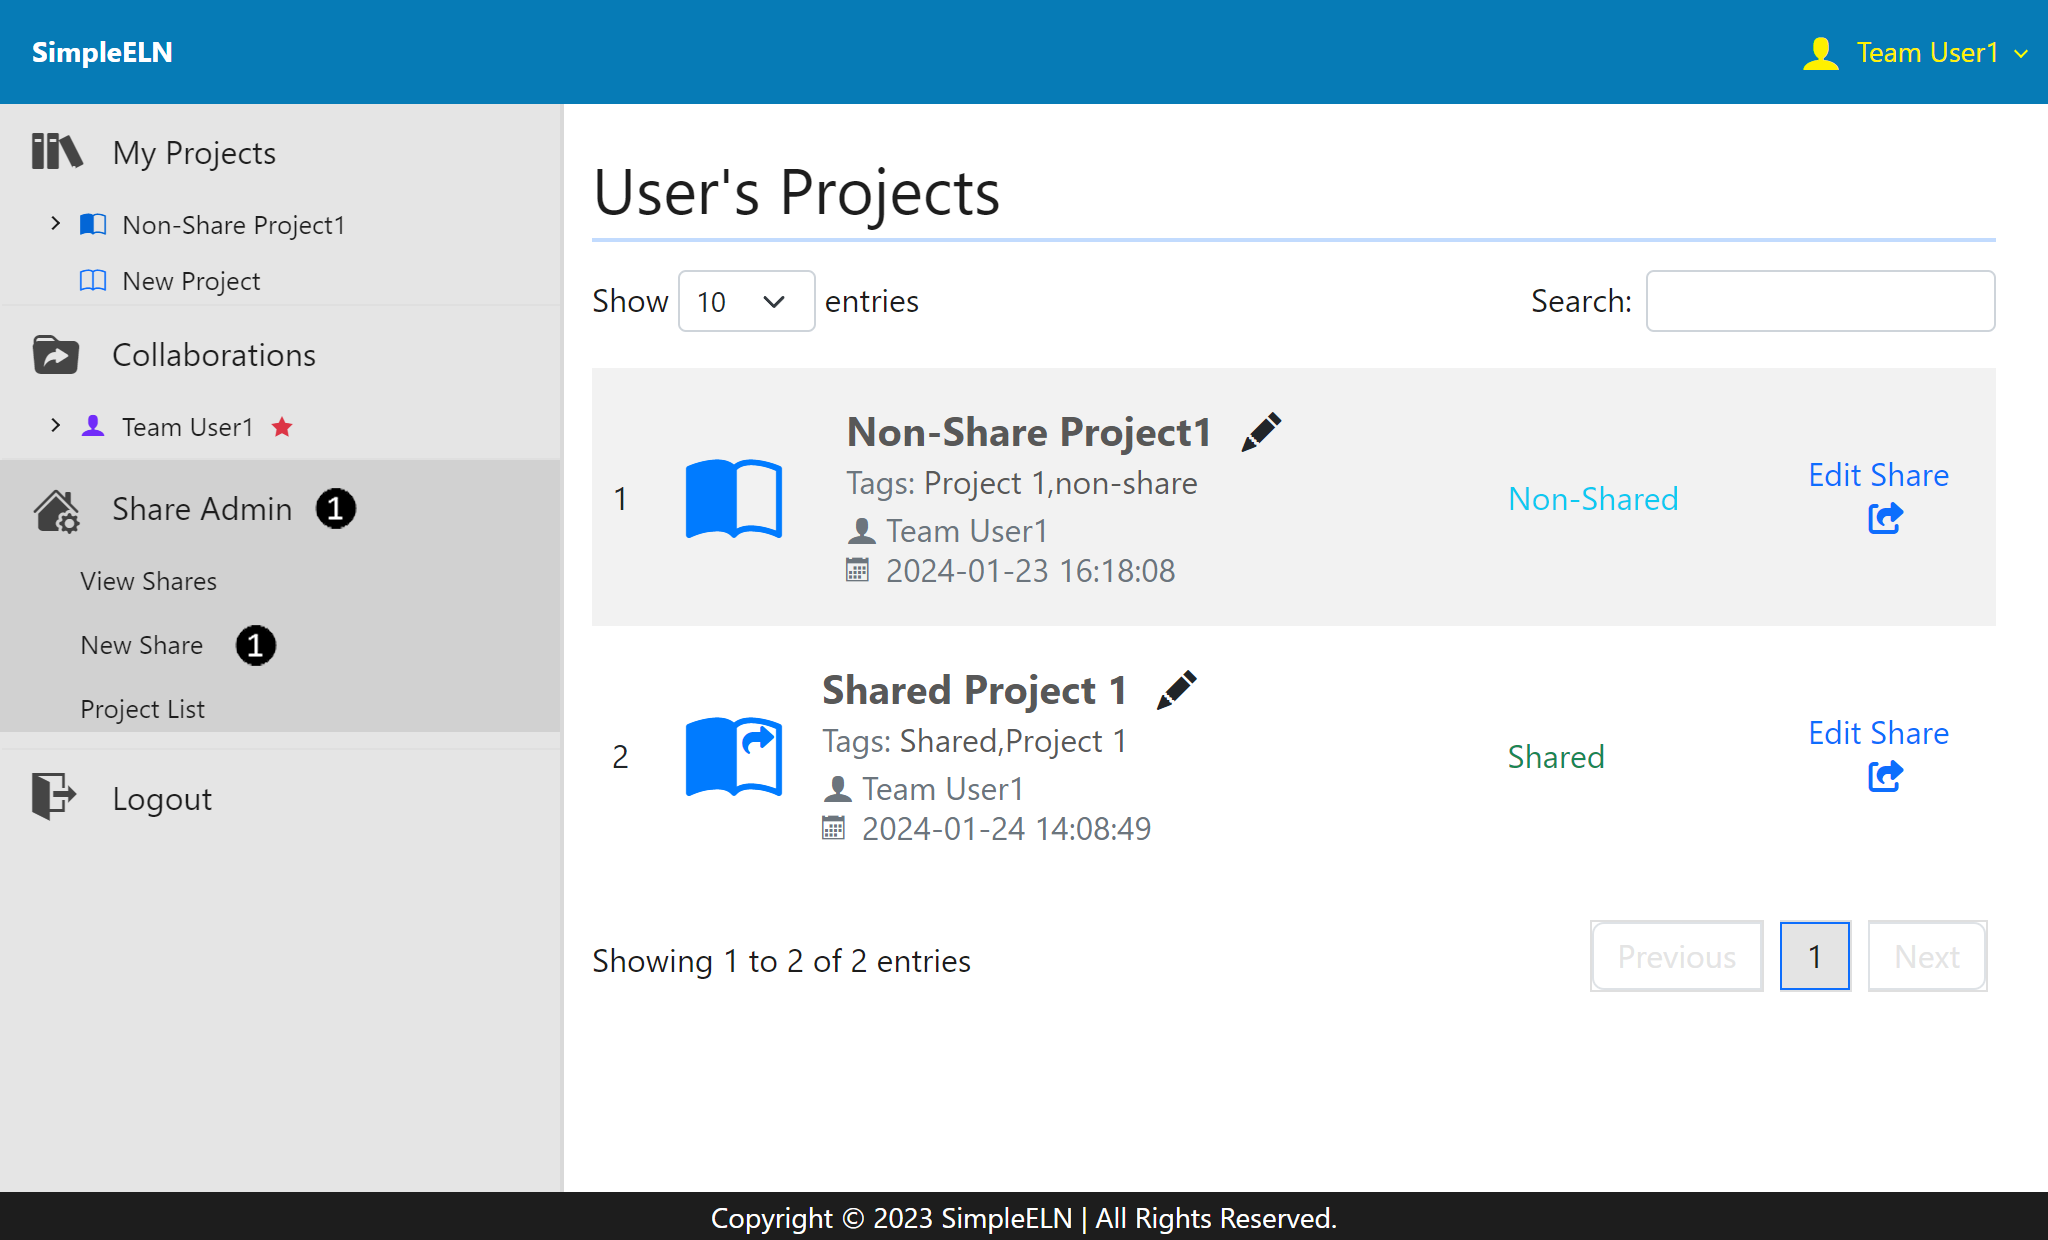
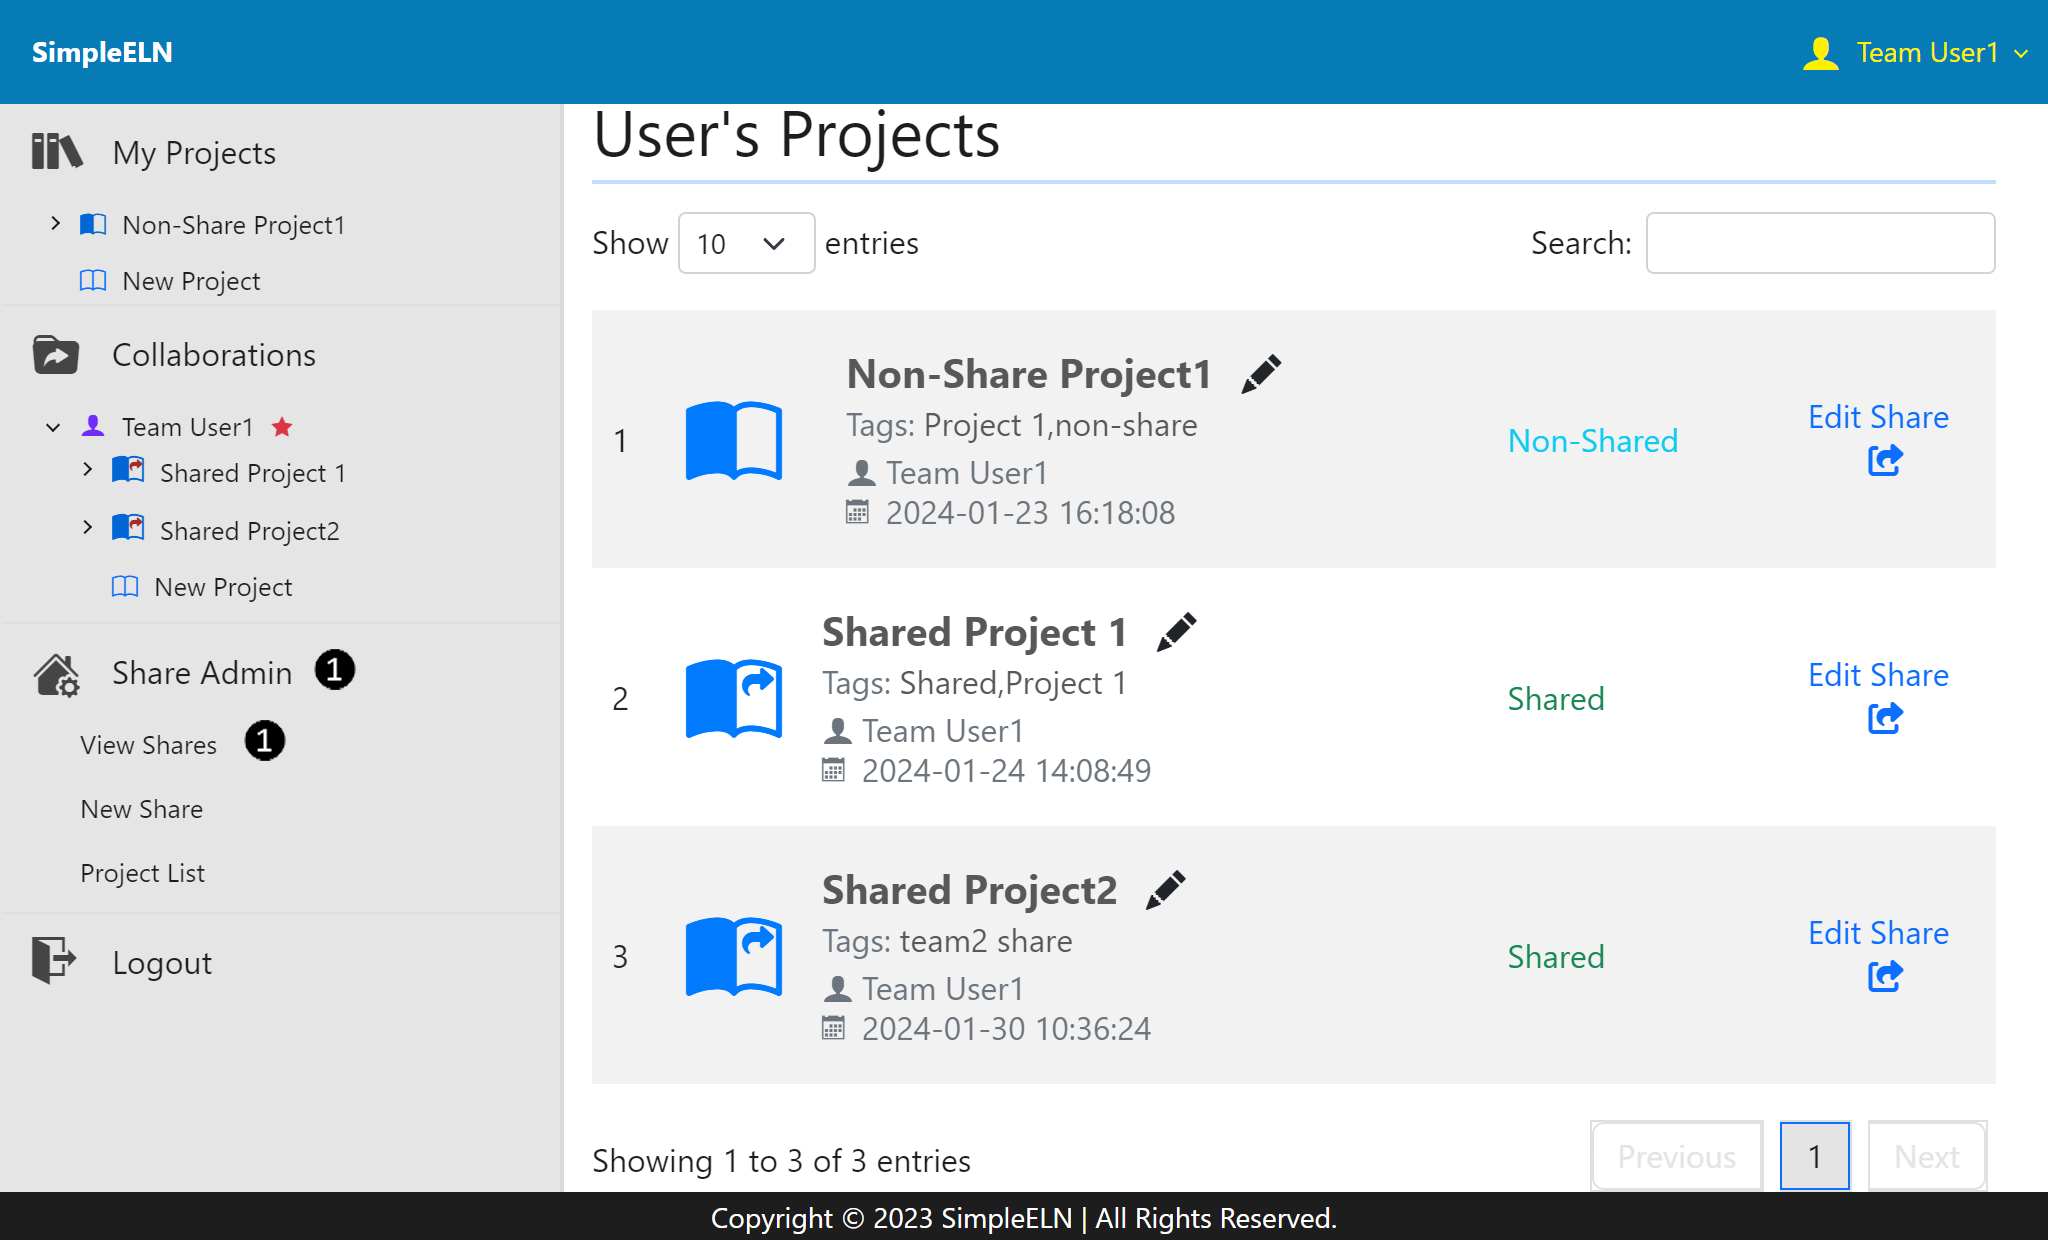
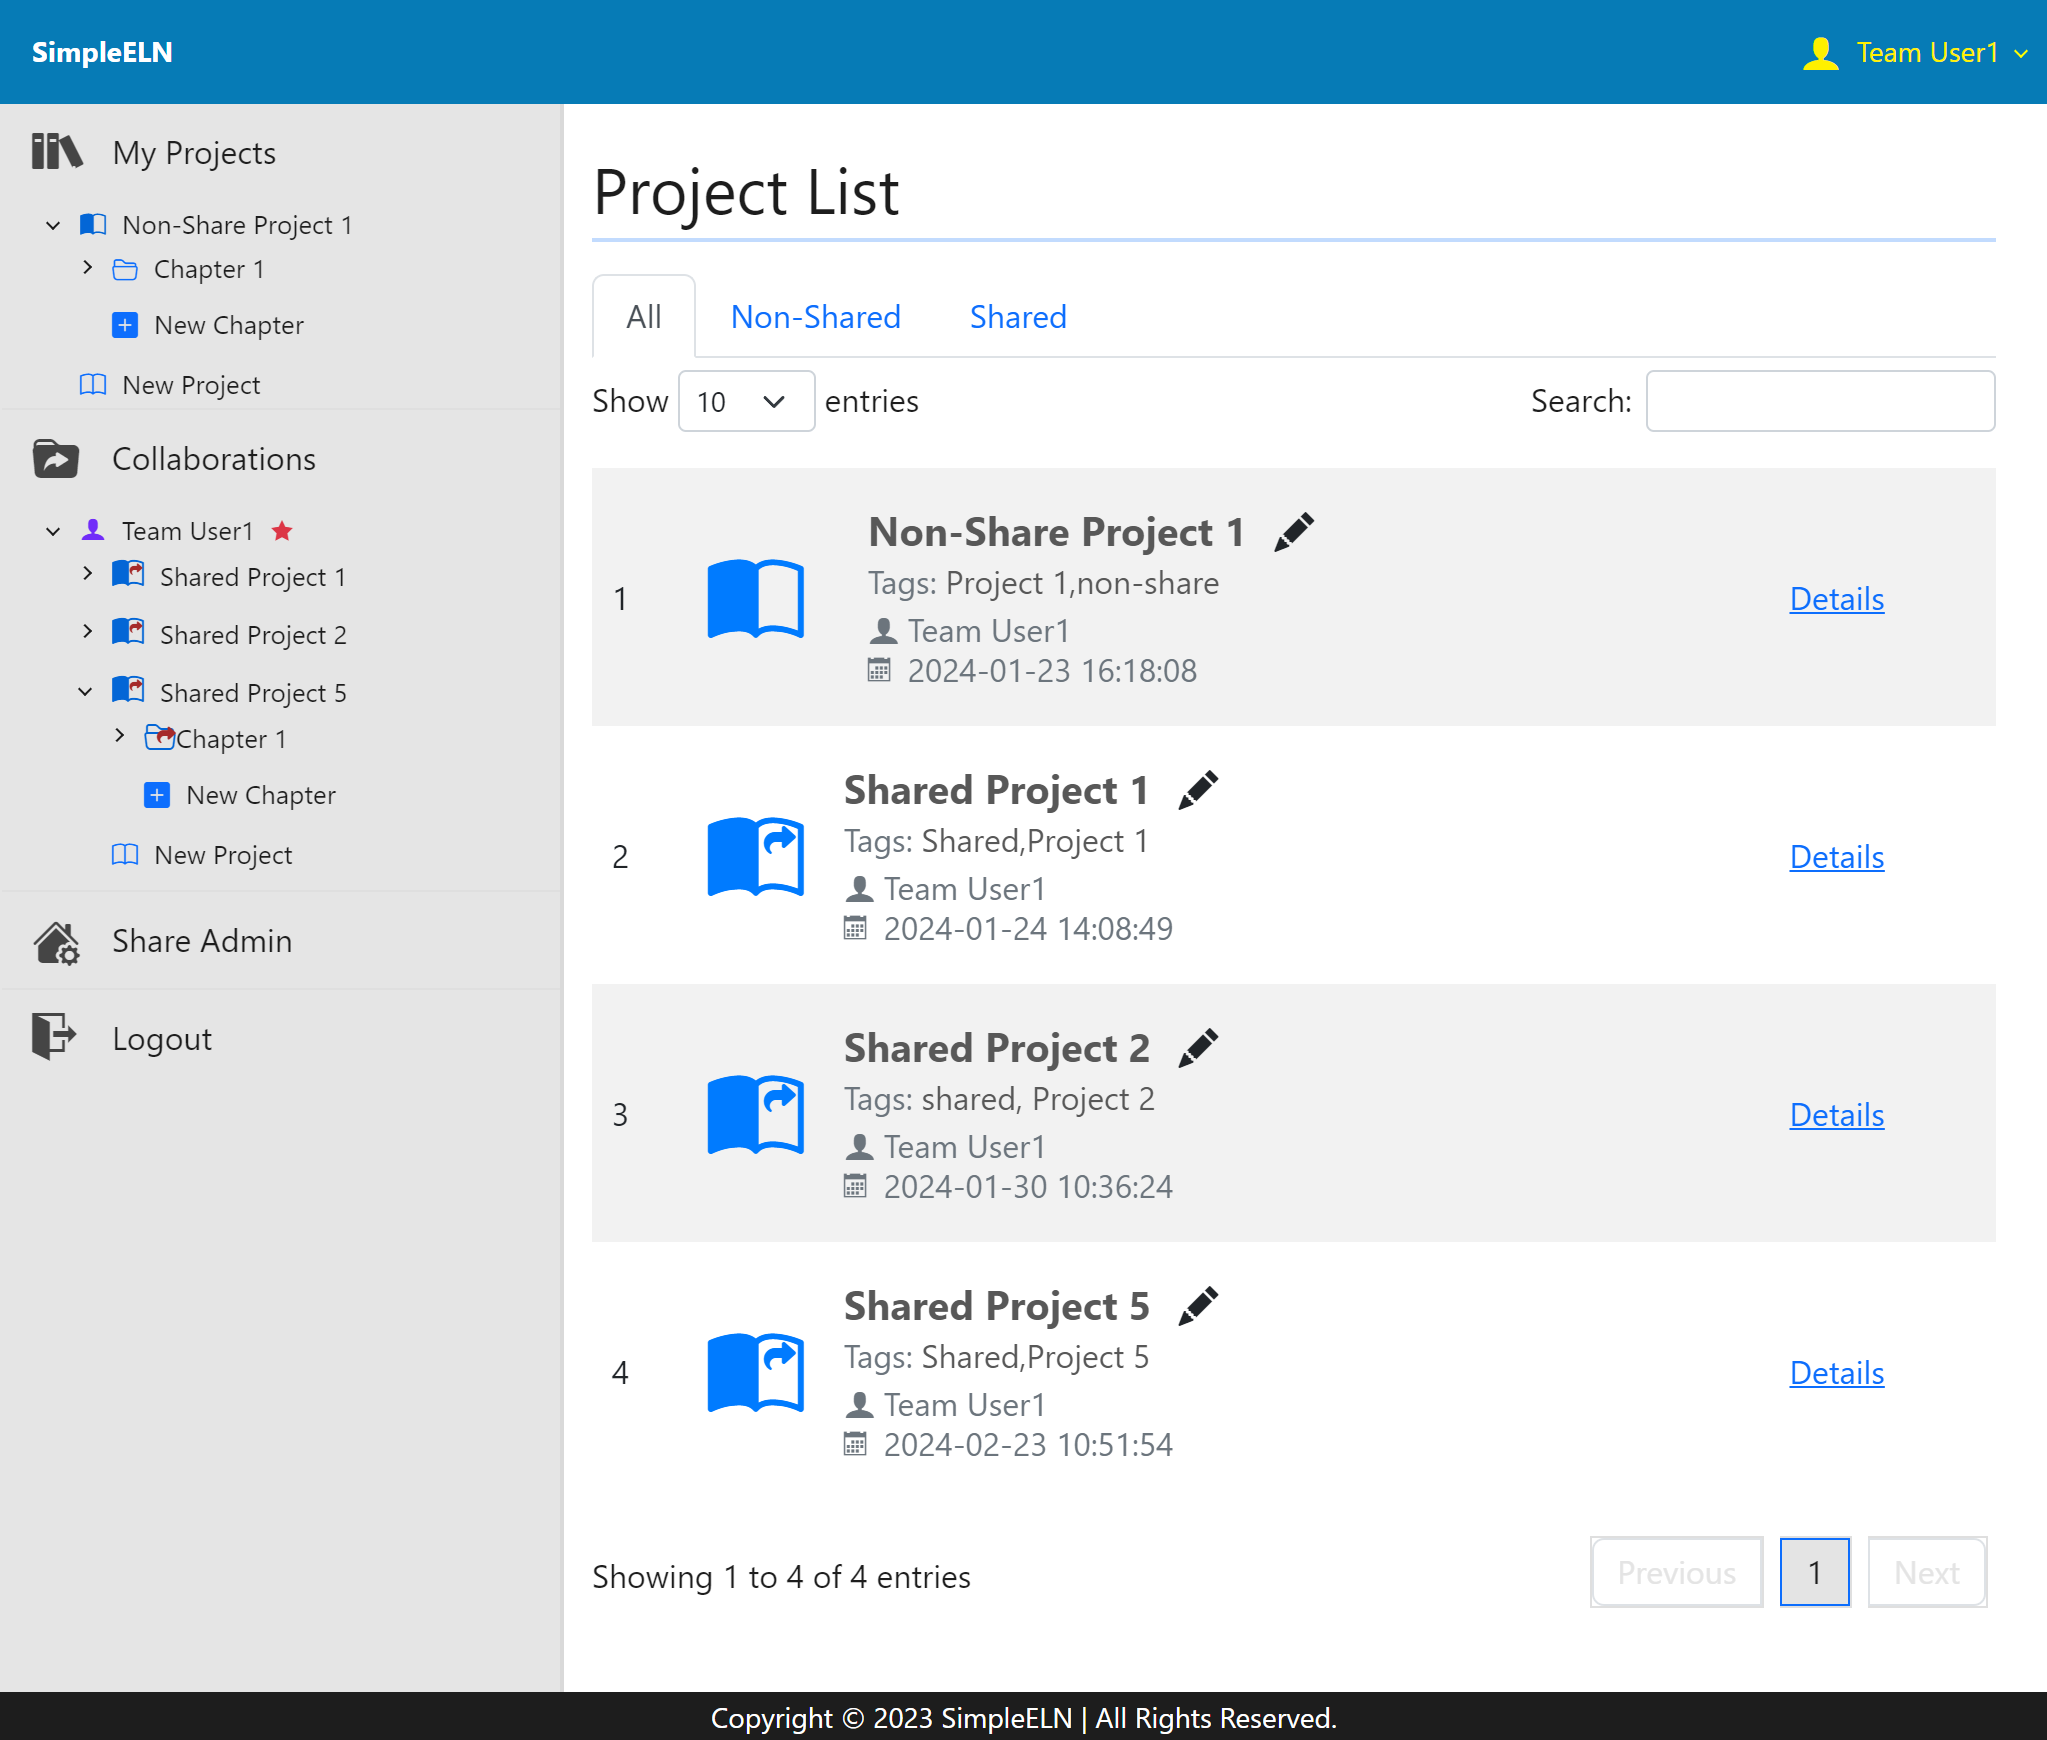
Fig. 1.117 An overview of the projects created by Team User1. Team User1 has created four projects and shared them among members of both their own team and cross-team collaborators, as demonstrated above.
Fig. 1.118 An overview of the projects created by Team User2 and Team User3. Team User2 has created two projects and shared them with team members, as shown above. Team User3 has created only one project but has not shared it with any team members.
Overview of Team2’s Users and Their Associated Projects
Fig. 1.119 Team Member Accounts for a Sample Team Team2
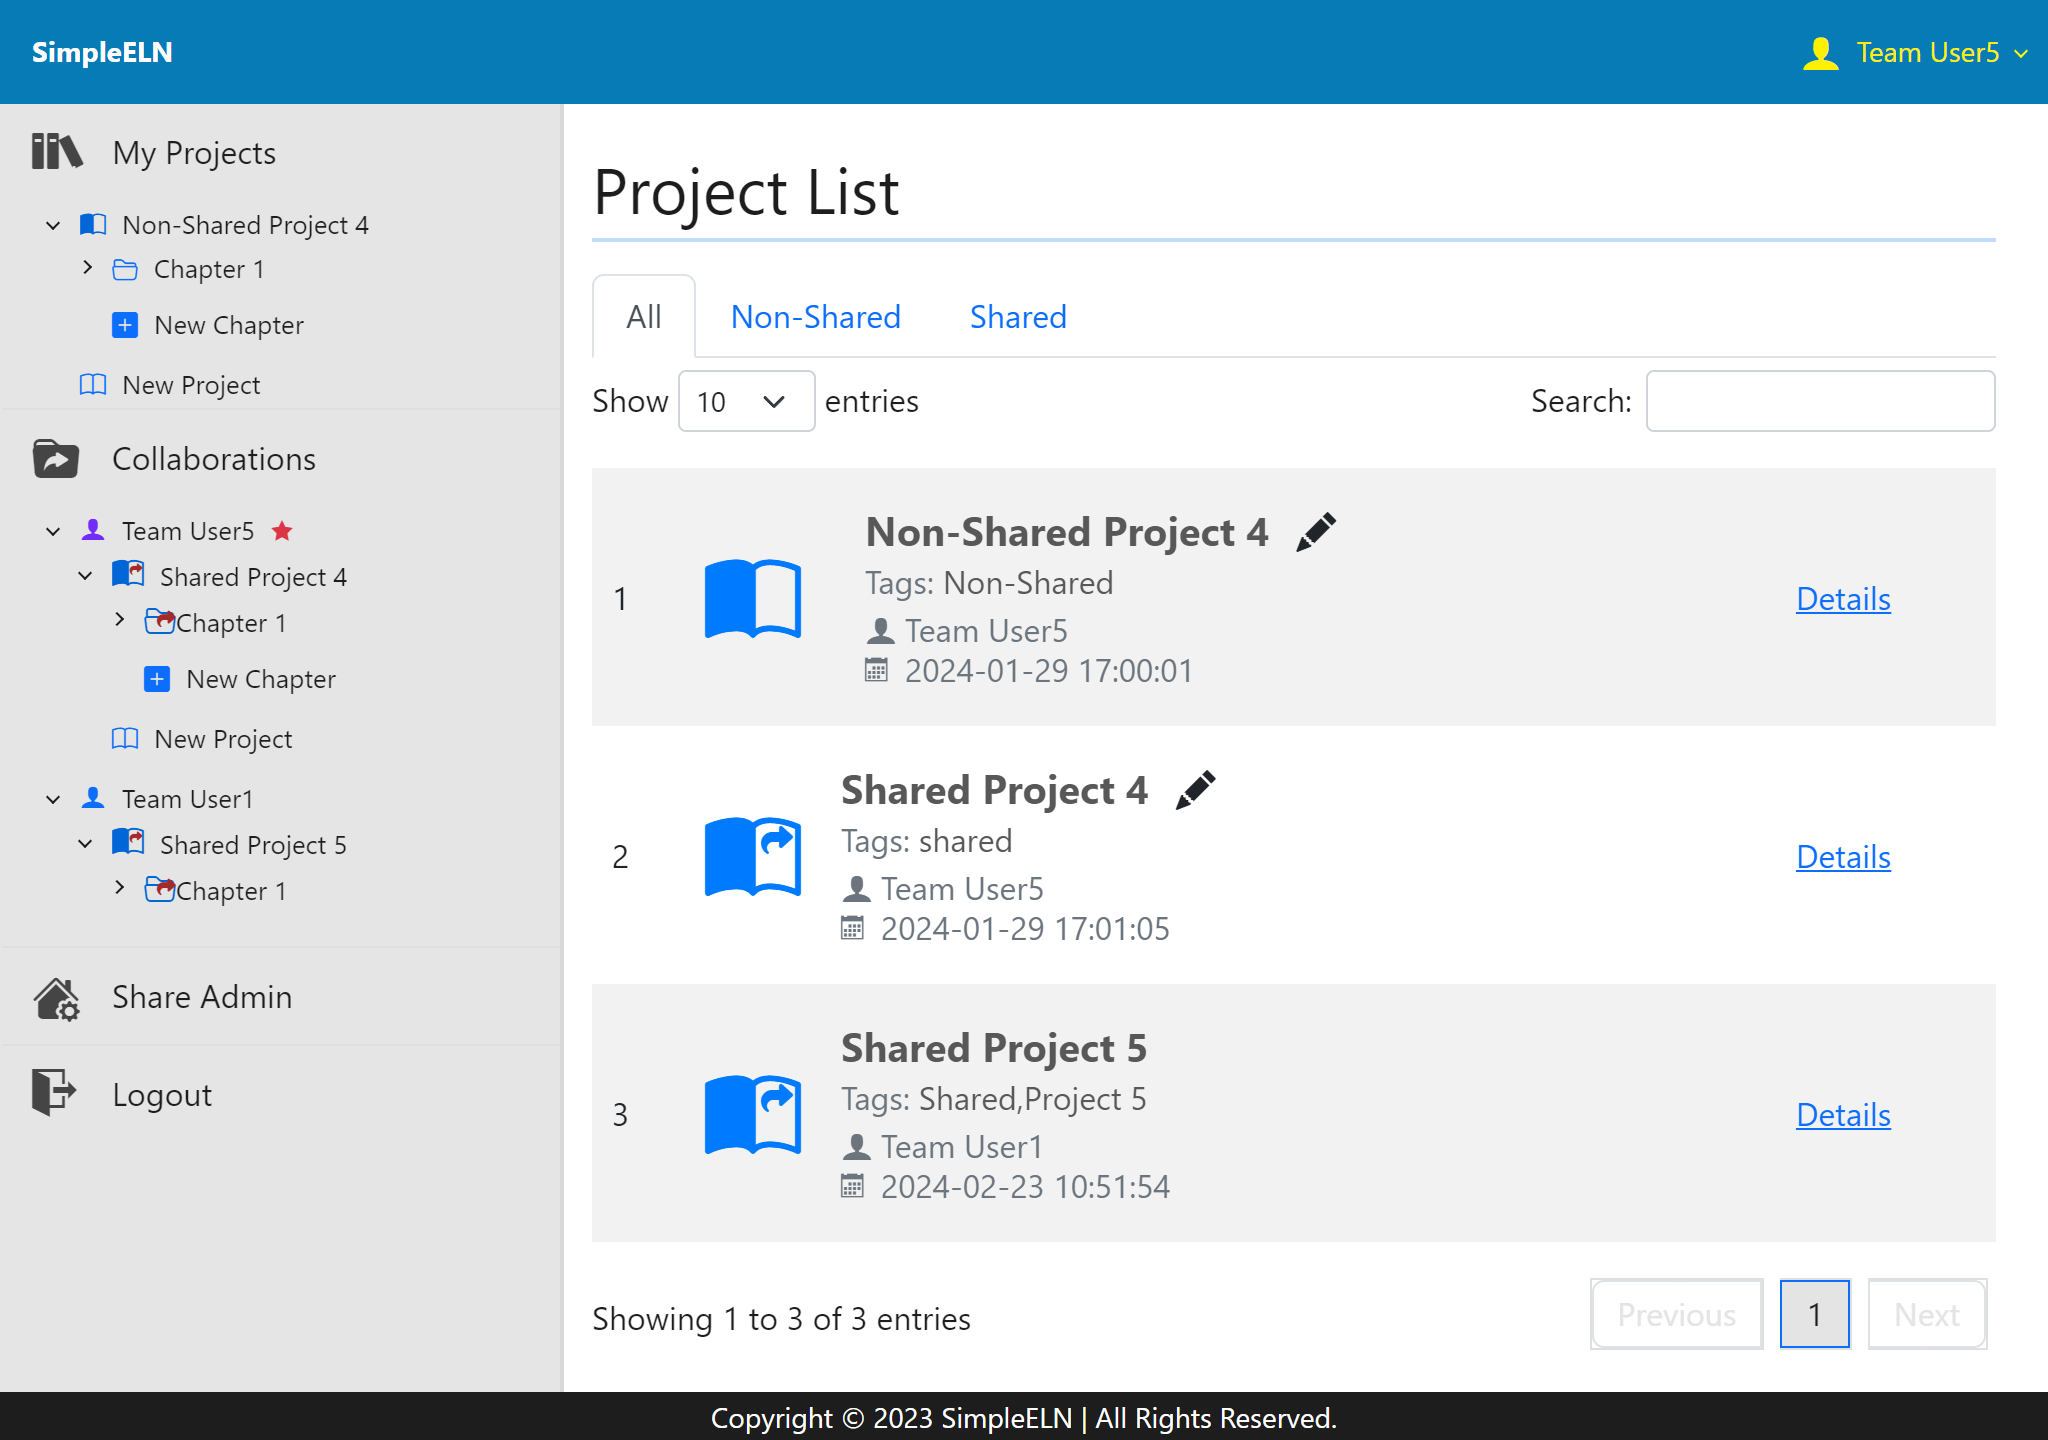
Fig. 1.120 An overview of the projects created by Team User5. Team User5 has created two projects and shared them with team members, as shown above.
1.5.3.4.7.1. Overview of Projects by Team User1, a Team User of Team1
Overview of Projects by Team User1, a Team User of Team1
Team User1 creates a non-shared project, which is listed under the My Projects section.
Non-Shared Project 1
Team User1 shares two projects with other team members, which are listed under the CollaborationsTeam User1 section.
Shared Project 1
Shared Project 2
Team User1 shares a project with team members from Team2, which are listed under the CollaborationsTeam User1 section.
Shared Project 5
Fig. 1.121 Overview of Projects by Team User1. New data entries are enabled in projects created by Team User1, including options such as New Chapter/Section/Experiment/Protocol/Result/Attachment.
1.5.3.4.7.2. Overview of Projects by Team User2, a Team User of Team1
Overview of Projects by Team User2, a Team User of Team1
Team User2 creates a non-shared project, which is listed under the My Projects section.
Team User2 creates a shared project, which is listed under the Collaborations section.
Team User1 shares two projects with Team User2, which are listed under the Collaborations section.
Fig. 1.122 Overview of Projects by Team User2. New data entries are enabled in projects, whether created by Team User2 or by other users and shared with Team User2 with Read-Write/Comment Sharing Access. However, if the sharing access is Read-Only/Comment Sharing Access, no new data entries are enabled.
1.5.3.4.7.3. Overview of Projects by Team User5, a Team User of Team2
Overview of Projects by Team User5, a Team User of Team2
Team User5 creates a non-shared project, which is listed under the My Projects section.
Non-Shared Project 4
Team User5 shares a project with other team members, which are listed under the CollaborationsTeam User5 section.
Shared Project 4
Team User1 shares a project with Team User5 with Read-Only/Comment Sharing Access, which is listed under the CollaborationsTeam User1 section.
Shared Project 5
Fig. 1.123 Overview of Projects by Team User5. New data entries are enabled in projects created by Team User5, including options such as New Chapter/Section/Experiment/Protocol/Result/Attachment. However, if the sharing access is Read-Only/Comment Sharing Access, no new data entries are enabled, but the contents of the shared data can be viewed.
1.5.3.4.7.4. Overview of Projects by Team User6, a Team User of Team2
Overview of Projects by Team User6, a Team User of Team2
Team User6 creates no non-shared project, so that there is no project listed under the My Projects section.
Team User6 creates no shared project, so that there is no project listed under the CollaborationsTeam User6 section.
Team User5 shares a project with Team User6 with Read-Only/Comment Sharing Access, which is listed under the CollaborationsTeam User5 section.
Fig. 1.124 Overview of Projects by Team User6. New data entries are enabled for projects created by other users and shared with Team User6 with Read-Write/Comment Sharing Access. However, if the sharing access is Read-Only/Comment Sharing Access, no new data entries are enabled.
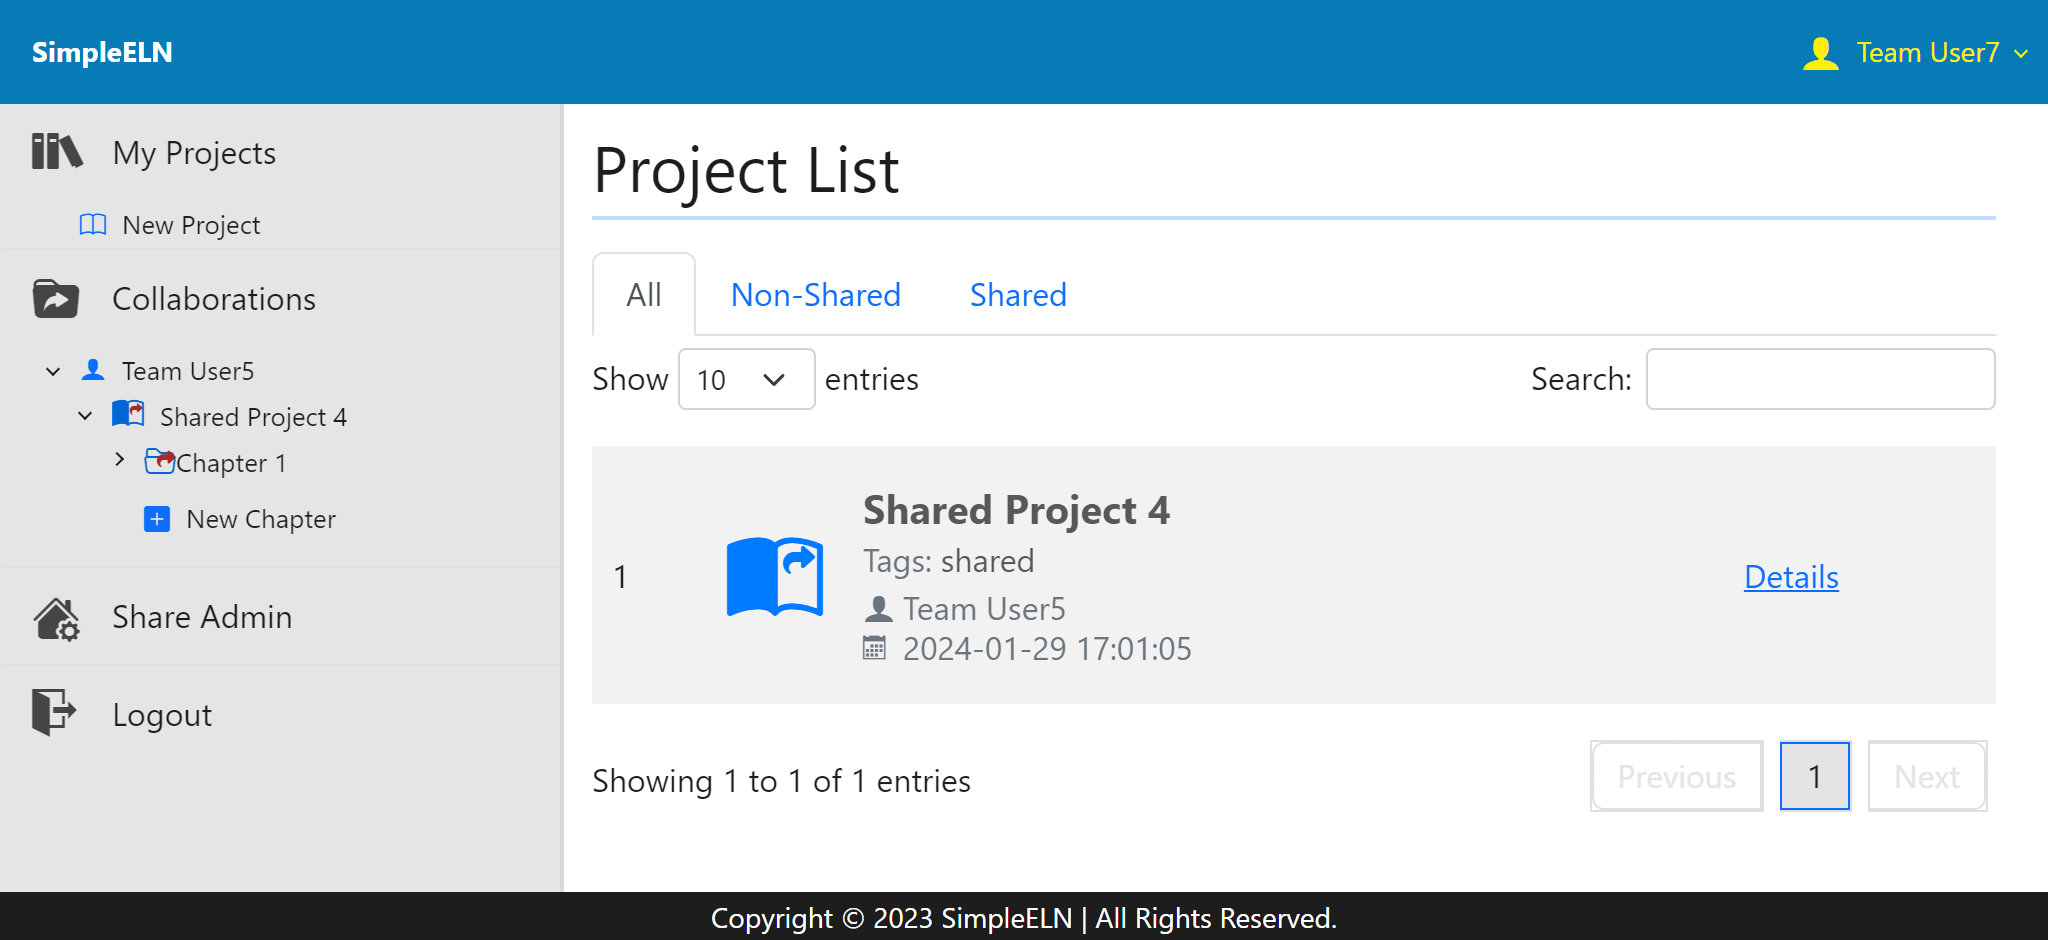
1.5.3.4.7.5. Overview of Projects by Team User7, a Team User of Team2
Overview of Projects by Team User7, a Team User of Team2
Team User7 creates no non-shared project, so that there is no project listed under the My Projects section.
Team User7 creates no shared project, so that there is no project listed under the CollaborationsTeam User7 section.
Team User5 shares a project with Team User7 with Read-Write/Comment Sharing Access, which is listed under the CollaborationsTeam User5 section.
Fig. 1.125 Overview of Projects by Team User7. New data entries are enabled for projects created by other users and shared with Team User7 with Read-Write/Comment Sharing Access.
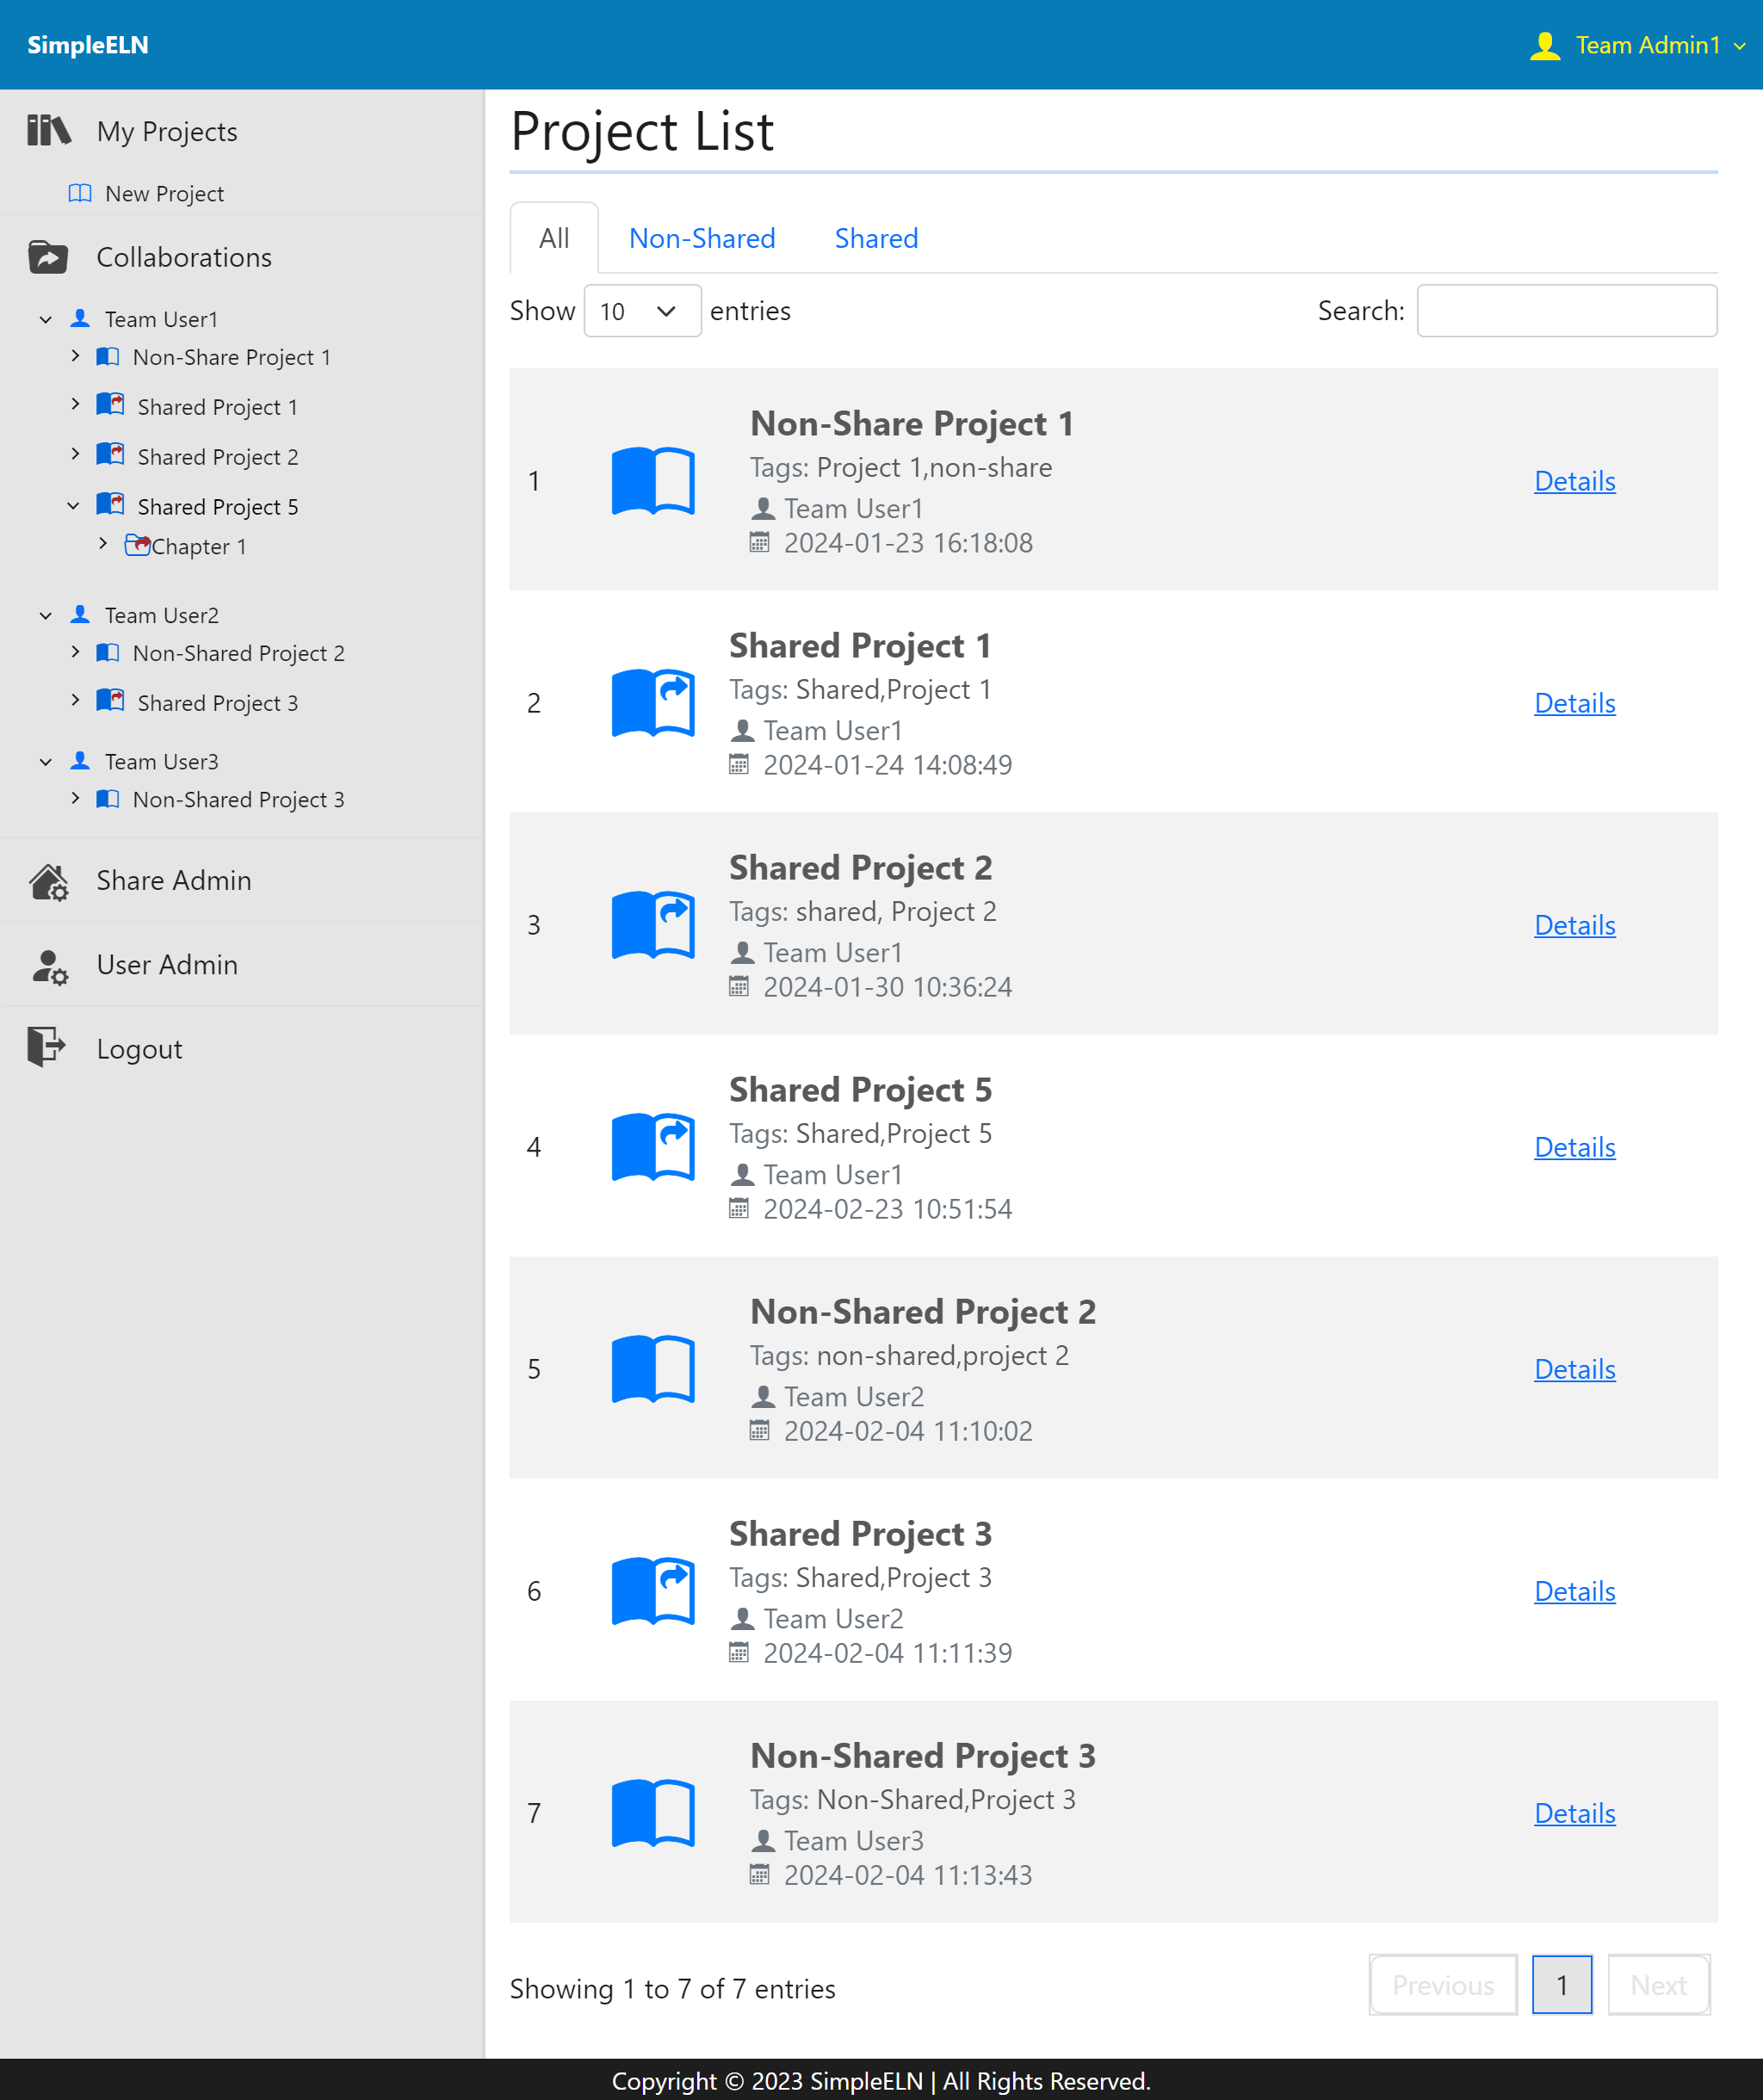
1.5.3.4.7.6. Overview of Projects by Team Admin1, the team administrator of Team1
Overview of Projects by Team Admin1, the team administrator of Team1
The team, Team1, has a team administrator and four team users: Team Admin1, Team User1, Team User2, Team User3, and Team User4.
Team User1 creates four projects, which are listed under the CollaborationsTeam User1 section.
Team User2 creates two projects, which are listed under the CollaborationsTeam User2 section.
Team User3 creates one project, which is listed under the CollaborationsTeam User3 section.
Team User4 does not create any projects, and accordingly, no entry is listed under the CollaborationsTeam User4 section.
None of the team users share a project with Team Admin1, the team administrator, with Read-Write/Comment Sharing Access.
Team Admin1, the team administrator, has Read-Only/Comment Sharing Access to projects created by the managed team members.
Fig. 1.126 Overview of Projects by Team Admin1. The team administrator, Team Admin1, has Read-Only/Comment Sharing Access to projects created by the managed team members.
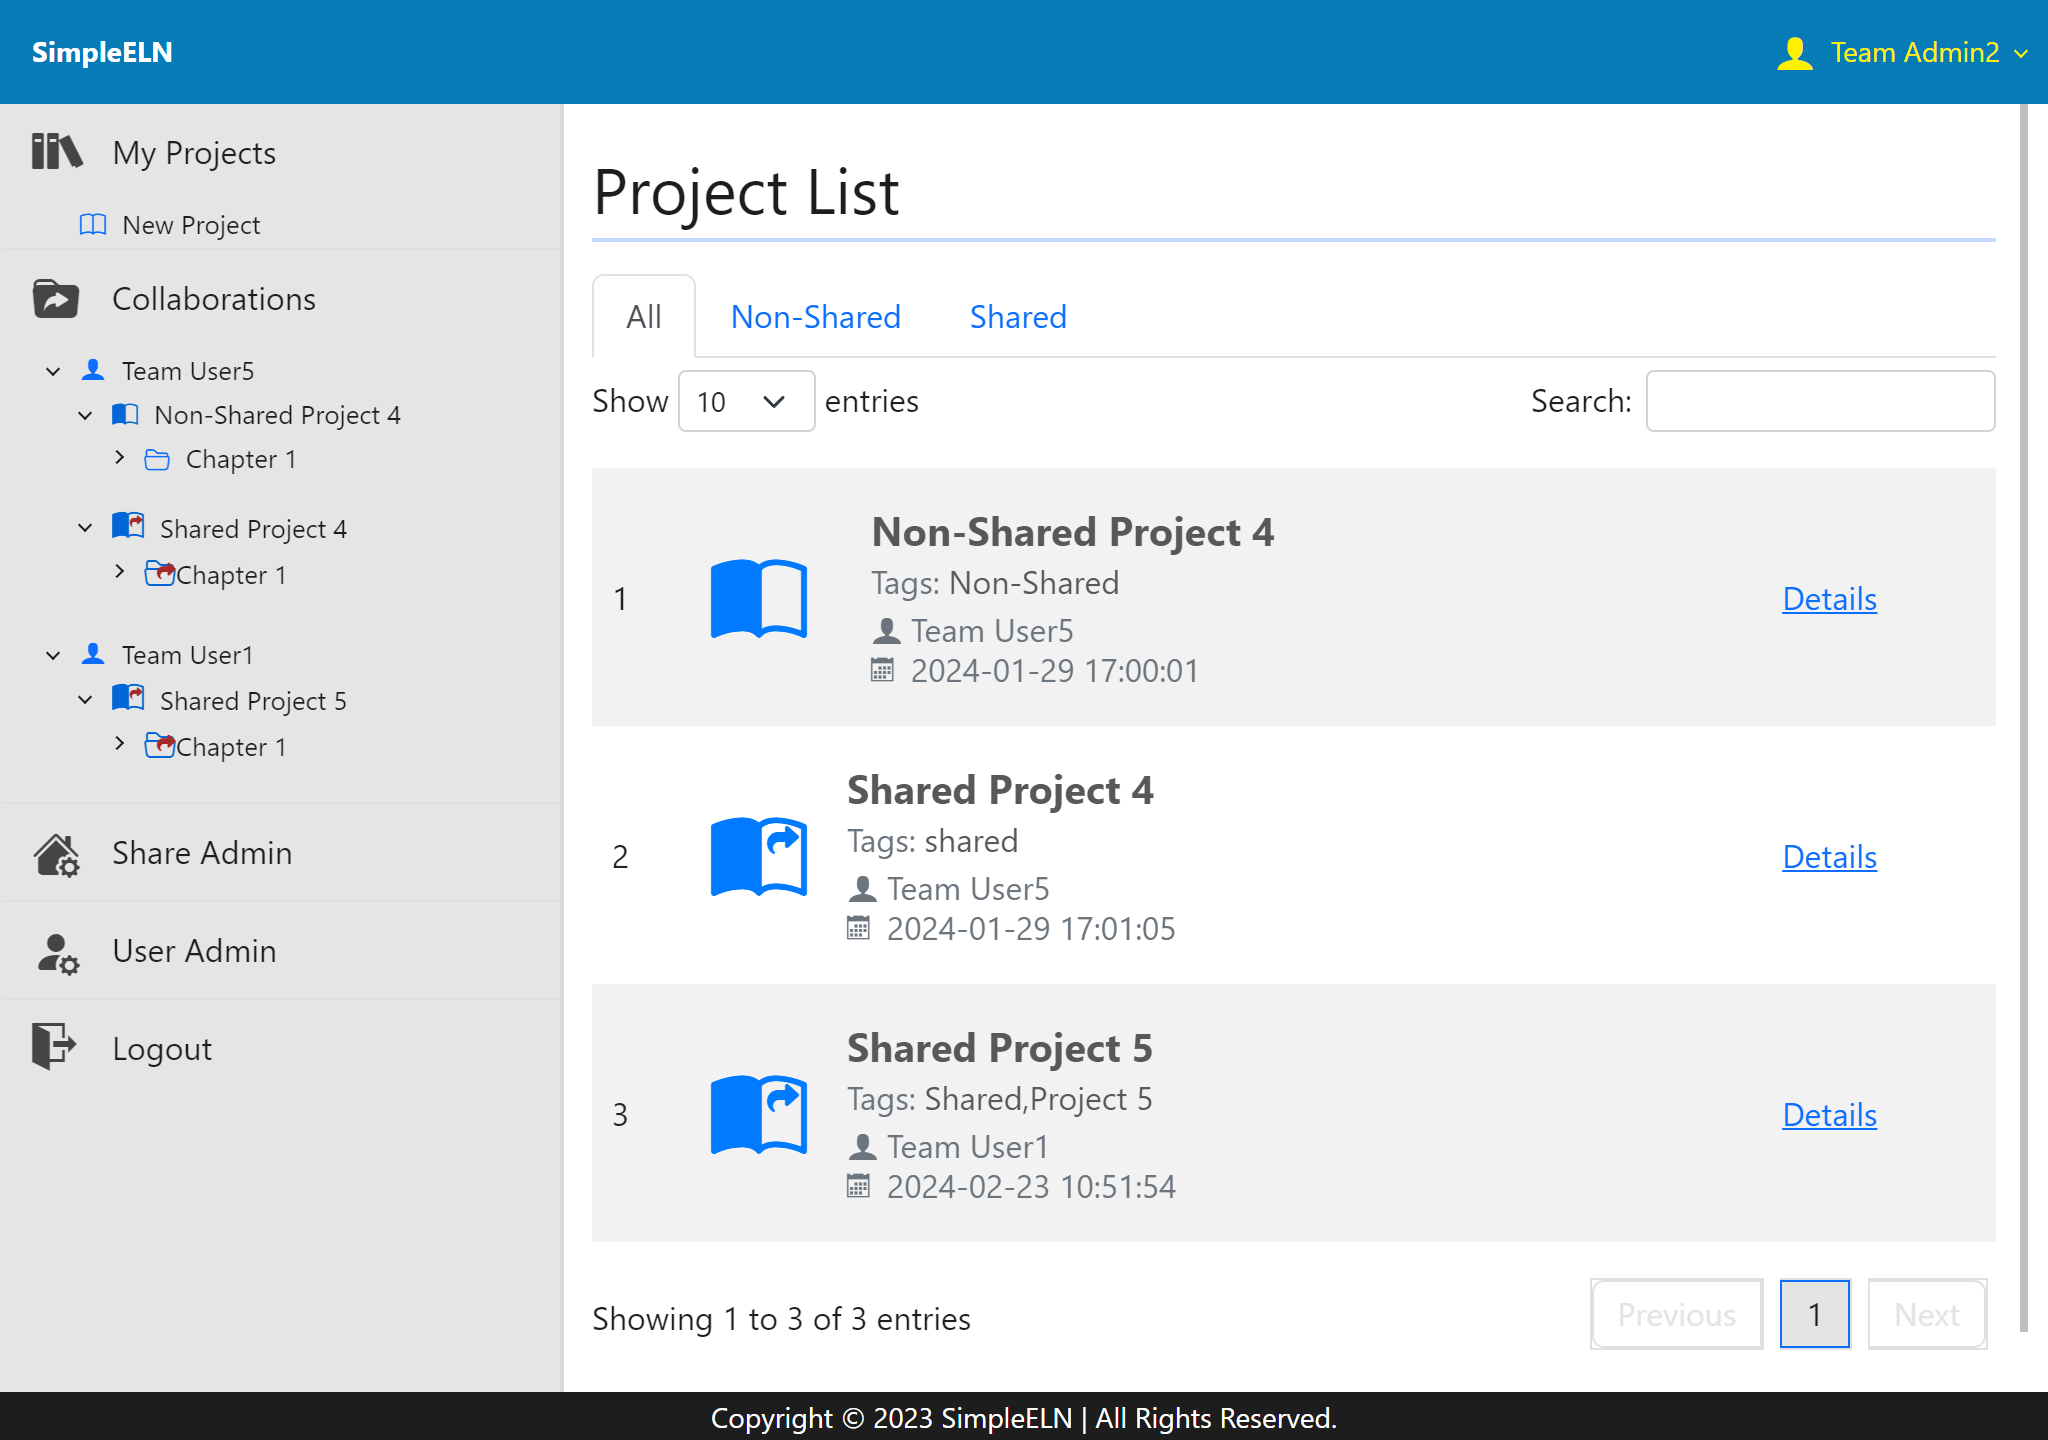
1.5.3.4.7.7. Overview of Projects by Team Admin2, the team administrator of Team2
Overview of Projects by Team Admin2, the team administrator of Team2
The team, Team2, has a team administrator and three team users: Team Admin2, Team User5, Team User6, and Team User7.
Team User5 creates two projects, which are listed under the CollaborationsTeam User5 section.
Team User6 does not create any projects, and accordingly, no entry is listed under the Collaborations section.
Team User7 does not create any projects, and accordingly, no entry is listed under the Collaborations section.
Team User1 shares a project with Team User5 with Read-Only/Comment Sharing Access, which is listed under the CollaborationsTeam User1 section.
None of the team users share a project with Team Admin2, the team administrator, with Read-Write/Comment Sharing Access.
Team Admin2, the team administrator, has Read-Only/Comment Sharing Access to projects created by the managed team members.
Fig. 1.127 Overview of Projects by Team Admin2. The team administrator, Team Admin2, has Read-Only/Comment Sharing Access to projects created or shared by the managed team members. As Team User5 is managed by Team Admin2, projects created by members of other teams and shared with Team User5 are Read-Only/Comment shared with Team Admin2.
New Project to redirect to the Create New Project page.
My Projects
Collaborations User Name
 Project Title in sequence to redirect to the project details page.
 icon to show the share configuration page.
 Shared Users, and then
  New Share to share the project with other users.
 Share Admin Entry